0%

Redis

Redis

Remote Dictionary Server 即远程字典服务, 是一个开源的使用 ANSI C 语言编写、支持网络、可基于内存亦可持久化的日志型、Key-Value 数据库,并提供多种语言的 API, Redis 能读的速度是 11 万次/s,写的速度是 8.1 万次/s
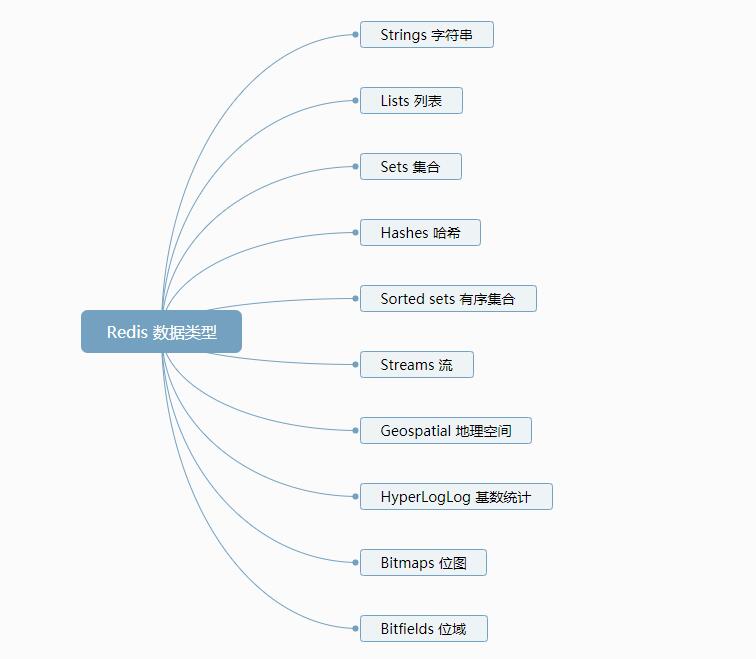
Redis 通常被称为数据结构服务器, 因为它的核心数据类型包括字符串、列表、字典(或哈希)、集合和排序集合等大多编程语言都支持的数据类型. 高版本版的 Redis 还添加了计算基数、地理定位和流处理等高级功能

数据类型

redis-1

工具命令

  • redis-benchmark 压测工具
    • -h 主机名
    • -p 端口号
    • -s socket 连接(覆盖 host 和 port)
    • -a 认证密码
    • --user 用户名
    • -c 客户端并发连接数(default 50)
    • -n 请求数(default 100000)
    • -d 测试数据的大小(default 3)
    • --dbnum 连接的数据库编号(default 0)
    • -k 是否保持连接
    • -r SET/GET/INCR 使用随机 key, SADD 使用随机值
    • -p 通过管道传输
    • -q 退出, 仅显示 query/sec 值
    • --csv 以 CSV 格式输出
    • -l 循环永远运行测试
    • -t 仅运行以逗号分割的命令列表
    • -I Idle 模式, 仅打开 N 个 idle 连接并等待
    • -x 从 STDIN 读取最后一个参数
1
127.0.0.1:6379>redis-benchmark -h localhost -p 6379 -c 100 -n 100000 -d 10 -t set,get,hset,hget,lpush,rpush,sadd
  • redis-check-aof 检查 aof 备份文件

  • redis-check-rdb 检查 rdb 备份文件

  • redis-cli –user <username> –pass <password> 使用用户名密码连接 redis

    • -r 指定运行命令的次数
    • -i 设置不同命令调用之间的延迟(以秒为单位)
    • -x 从标准输入中读取最后一个参数
    • --bigkeys 查找大键
    • --stat 监控当前 redis 的使用情况
    • --eval <file> 使用 EVAL 命令解析 lua 脚本
    • --function-rdb <filename> 从现有服务器中提取函数(不包含 key)
1
2
3
4
5
6
# 加载 lua 脚本注册的 redis 函数
# 第一种方式
[root@centos7 workspace]# redis-cli -x FUNCTION LOAD < ./mylib.lua

# 第二种方式
[root@centos7 workspace]# cat mylib.lua | redis-cli -x FUNCTION LOAD REPLACE

开机启动

  • /usr/lib/systemd/system/ 目录中创建 redis.service 文件, 使用 yum install 安装 Redis 自动创建此文件
  • 使用命令 ln -s /usr/lib/systemd/system/redis.service /etc/systemd/system/redis.service 创建到系统服务目录的软链接
  • 编辑 redis.service 文件
1
2
3
4
5
6
7
8
9
10
11
12
13
[Unit]   # 控制单元定义
Description=redis-service # 当前配置文件的描述信息
After=network.target # 表示当前服务在哪个服务后面启动,一般定义为网络服务启动之后

[Service] # 服务定义
Type=forking # 定义启动类型
ExecStart=/usr/local/bin/redis-server /root/workspace/redis6379.conf # 定义启动进程时执行的命令
#ExecReload= # 定义重启服务时执行的命令
#ExecStop= # 定义关闭进程时执行的命令
PrivateTmp=true # 是否分配独立空间

[Install] # 安装定义
WantedBy=multi-user.target # 表示服务所在 target, target 表示一组服务
  • 使用命令 systemctl daemon-reload 重启系统服务管理守护进程
  • 使用命令 systemctl start redis.service 启动 Redis 服务
  • 使用命令 systemctl enable redis.service 允许 Redis 服务开机启动

CONFIG 命令

  • CONFIG GET parameter [parameter…] 获取指定配置项的值
  • CONFIG HELP 显示 CONFIG 命令的帮助信息
  • CONFIG RESETSTAT 重置 INFO 返回的统计信息, ok 成功
  • CONFIG REWRITE 将内存中的配置项重写到配置文件中
  • CONFIG SET parameter value [parameter value …] 设置配置项

Keys 命令

  • INFO [section [section …]] 返回服务的相关信息, 没有参数返回所有

    • server 返回 redis 服务的通用信息

    • clients 返回客户端链接的信息

      1
      2
      3
      4
      5
      6
      7
      8
      9
      # Clients
      connected_clients:1
      cluster_connections:0
      maxclients:10000
      client_recent_max_input_buffer:20480
      client_recent_max_output_buffer:0
      blocked_clients:0
      tracking_clients:0
      clients_in_timeout_table:0
    • memory 返回内存的信息

    • persistence 返回持久化的信息 RDB 和 AOF

    • stats 返回统计信息

    • replication 返回副本的信息

      1
      2
      3
      4
      5
      6
      7
      8
      9
      10
      11
      12
      # Replication
      role:master
      connected_slaves:0
      master_failover_state:no-failover
      master_replid:5b0d7d50614d939be22b4bedb80450d13bfd64a0
      master_replid2:0000000000000000000000000000000000000000
      master_repl_offset:0
      second_repl_offset:-1
      repl_backlog_active:0
      repl_backlog_size:1048576
      repl_backlog_first_byte_offset:0
      repl_backlog_histlen:0
    • cpu 返回 cpu 的信息

    • commandstats 返回命令统计信息

    • latencystats 返回命令延迟百分比统计信息

    • cluster 返回集群信息

    • modules 返回模块信息

    • keyspace 返回数据库相关统计信息

      1
      2
      # Keyspace
      db0:keys=3,expires=0,avg_ttl=0
    • errorstats 返回错误统计信息

    • all 返回所有信息(除了 modules)

    • default 返回默认配置信息

    • everything 返回所有信息(包含 all 和 modules)

  • help command 显示命令的帮助信息

    • @[string] 显示当前数据类型的帮助信息
  • ECHO message 打印信息

  • SAVE 保存数据到本地磁盘

  • WAIT numreplicas timeout 阻止当前客户端, 直到所有先前的写入命令成功传输并至少由指定数量的副本确认, 如果达到了以毫秒为单位指定的超时, 则即使尚未达到指定的副本数量, 该命令也会返回

  • ROLE 返回当前实例的角色是 master、slave、sentinel, 和当前实例上下文副本的信息

  • PING [message] 测试连接是否正常, 通常返回 PONG, 如果传入了 message 则会输出 message

  • QUIT 关闭退出当前连接

  • SHUTDOWN [NOSAVE|SAVE] [NOW] [FORCE] [ABORT] 同步保存数据到硬盘上并关闭服务

  • MONITOR 启动监听模式输出服务器执行的每条命令

  • clear 清空屏幕

操作 key

  • TYPE key 返回指定 key 的类型, none 表示 key 不存在

  • EXISTS key [key …] 检查指定 key 是否存在, 1 存在, 0 不存在

  • KEYS pattern 查找给定模式(pattern)的 key, 返回列表, 未找到返回 (empty array), KEYS * 返回所有 key

  • DEL key [key…] 阻塞删除 key 并返回成功删除 key 的数量

  • UNLINK key [key …] 非阻塞从键空间中取消指定 key 的链接(在其他线程中执行实际的内存回收), 并返回成功取消 key 的数量, 如果 key 不存在则忽略

  • RENAME key newKey 修改 key 的名称, 如果指定 key 不存在返回 错误, 如果 newkey 已存在则覆盖

  • RENAMENX key newkey 修改 key 的名称, 如果指定 key 不存在返回 错误, 如果 newkey 已存在不执行任何操作返回 0, 否则返回 1

  • MOVE key db 将当前数据库中的 key 移动到指定的数据库(db)中

  • DUMP key 序列化指定 key, 并返回被序列化的值, 不存在返回 <nil>

  • TOUCH key [key …] 更改指定 key 的最后一次访问时间并返回修改成功的数量, 如果 key 不存在则忽略

  • SORT key [BY pattern] [LIMIT offset count] [GET pattern [GET pattern …]] [ASC|DESC] [ALPHA] [STORE destination]

    对 list、set、zset 集合中的元素进行排序, 默认是按照数字或者元素的双精度浮点数去比较

  • SCAN cursor [MATCH pattern] [COUNT count] [TYPE type] 查找给定模式(pattern)的 key, 返回列表和上次遍历时的游标

    • COUNT 控制匹配结果的数量, 默认为 10
    • TYPE 过滤匹配结果中的类型, 可取值 string, list, set 等 redis 支持的数据类型
1
2
3
4
5
6
7
8
9
10
11
12
13
14
15
16
17
18
19
20
21
22
23
24
25
26
27
28
29
127.0.0.1:6379> KEYS *
1) "age"
2) "name"
3) "bit:zhang"
4) "xiaoming"
127.0.0.1:6379> SCAN 0 COUNT 10
1) "0"
2) 1) "age"
2) "bit:zhang"
3) "name"
4) "xiaoming"
127.0.0.1:6379> SCAN 0 MATCH *n*
1) "0"
2) 1) "bit:zhang"
2) "name"
3) "xiaoming"
127.0.0.1:6379> SCAN 0 MATCH *n* COUNT 2
1) "1"
2) 1) "bit:zhang"
127.0.0.1:6379> SCAN 0 MATCH *n* TYPE list
1) "0"
2) (empty array)
127.0.0.1:6379> SCAN 0 MATCH *n* TYPE string
1) "0"
2) 1) "bit:zhang"
2) "name"
127.0.0.1:6379> SCAN 0 MATCH *n* TYPE hash
1) "0"
2) 1) "xiaoming"

副本

  • REPLICAOF host port 将当前服务器设置为指定主机端口上服务器的副本, 通常返回 ok, 5.0.0 开始代替 SLAVEOF
    • 如果当前服务器已经是某个服务器的副本, 则取消对旧服务器的连接同步, 并开始对新服务器同步, 丢弃旧有数据集
    • NO ONE 如果当前服务器已经是副本, 此参数将当前服务器变为 master, 并停止与主服务器的连接同步

设置 key 的过期时间

  • EXPIRE key seconds [NX|XX|GT|LT] 为指定 key 设置过期时间(单位秒), 1 设置成功, 0 指定 key 不存在或者提供的参数跳过了操作
  • EXPIREAT key unix-time-seconds [NX|XX|GT|LT] 为指定 key 设置过期使用 unix 时间戳, 1 设置成功, 0 指定 key 不存在或者提供的参数跳过了操作
  • PEXPIRE key milliseconds [NX|XX|GT|LT] 为指定 key 设置过期时间(单位毫秒), 1 设置成功, 0 指定 key 不存在或者提供的参数跳过了操作
  • PEXPIREAT key unix-time-milliseconds [NX|XX|GT|LT] 为指定 key 设置过期时间使用 unix 时间戳, 1 设置成功, 0 指定 key 不存在或者提供的参数跳过了操作
  • EXPIRETIME key 返回指定 key 将过期的绝对 Unix 时间戳(以秒为单位), -1 表示 key 存在但没有过期时间, -2 表示 key 不存在, 7.0.0 支持
  • PEXPIRETIME key 返回指定 key 将过期的绝对 Unix 时间戳(以毫秒为单位), -1 表示 key 存在但没有过期时间, -2 表示 key 不存在, 7.0.0 支持
    • NX 以上命令该参数作用相同, 仅当指定 key 没有过期时间时
    • XX 以上命令该参数作用相同, 仅当指定 key 存在过期时间时
    • GT 以上命令该参数作用相同, 仅当新的过期时间大于当前的过期时间
    • LT 以上命令该参数作用相同, 仅当新的过期时间小于当前的过期时间

获取 key 的过期时间

  • TTL key 返回指定 key 以为单位剩余的生存时间
  • PTTL key 返回指定 key 以毫秒为单位剩余的生存时间
    • -2 key 不存在
    • -1 key 存在但没有设置剩余生存时间
1
2
3
4
5
6
7
8
127.0.0.1:6379> TTL age
(integer) -1
127.0.0.1:6379> EXPIRE age 30
(integer) 1
127.0.0.1:6379> TTL age
(integer) 23
127.0.0.1:6379> PTTL age
(integer) 23000
  • PERSIST key 移除指定 key 的过期时间, key 将永久保持, 1 成功, 0 key 不存在或者未设置过期时间

数据库操作

  • RANDOMKEY 从当前数据库随机返回一个 key, 如果当前数据库为空则返回 <nil>

  • SWAPDB index1 index2 切换两个数据库

  • SELECT index 更改当前连接的选定的数据库

  • DBSIZE 返回当前数据库中 key 的数量

  • FLUSHALL [ASYNC|SYNC] 清除所有数据库中的 key, 执行成功返回 ok

  • FLUSHDB [ASYNC|SYNC] 清除当前数据库中的 key, 执行成功返回 ok

安全认证

  • AUTH [username] password 对当前连接的认证, 或者切换用户

配置文件配置项

  • include /path/to/*.conf # 导入其他 redis 配置文件

  • protected-mode yes # 保护模式, 默认开启

  • tcp-backlog 511 # tcp 连接数

  • timeout 0 # 关闭客户端连接的延迟, 0 表示禁用, 单位秒

  • tcp-keepalive 300 # 保持长连接的时间, 单位秒

TLS/SSL

安全连接配置项, 默认未开启

  • tls-port 6379 # 安全连接端口
  • tls-cert-file redis.cert # 安全连接证书
  • tls-key-file redis.key # 安全连接 key
  • tls-key-file-pass secret # key 文件加密摘要
  • tls-client-cert-file client.crt # 客户端安全连接证书
  • tls-client-key-file client.key # 客户端安全连接 key
  • tls-client-key-file-pass secret # 客户端安全连接 key 文件加密摘要
  • tls-ca-cert-file ca.crt # CA 证书
  • tls-ca-cert-dir /etc/ssl/certs # CA 证书目录
  • tls-auth-clients no # no 不需要也不接受客户端证书连接, optional 证书不必需, 如果提供证书则必须验证有效
  • tls-session-caching no # 默认启用 TLS 会话缓存, no 表示禁用缓存
  • tls-session-cache-size 5000 # TLS 缓存大小, 默认 20480
  • tls-session-cache-timeout 60 # TLS 缓存有效期, 默认 300 秒

通用设置

  • loglevel notice # 设置日志级别, 默认 notice

    • debug (a lot of information, useful for development/testing)
    • verbose (many rarely useful info, but not a mess like the debug level)
    • notice (moderately verbose, what you want in production probably)
    • warning (only very important / critical messages are logged)
  • syslog-enabled no # 是否允许指向 系统 日志

  • syslog-ident redis # 日志标识符

  • databases 16 # 默认数据库数量

  • always-show-logo no # 是否总是显示 logo

  • set-proc-title yes # 设置进程标题

MEMORY

  • maxmemory-policy noeviction # 内存管理策略
    • volatile-lru 使用 LRU 算法移除 key, 只对设置了过期时间的 key
    • allkeys-lru 在所有集合 key 中, 使用 LRU 算法移除 key
    • volatile-lfu 使用 LFU 算法移除 key, 只对设置了过期时间的 key
    • allkeys-lfu 在所有集合 key 中, 使用 LFU 算法移除 key
    • volatile-random 在过期集合 key 中, 移除随机的 key, 只对设置了过期时间的 key
    • allkeys-random 在所有集合 key 中, 移除随机的 key
    • volatile-ttl 移除那些 TTL 值最小的 key, 即那些最近要过期的 key
    • noeviction 不进行移除, 针对写操作, 只是返回错误信息
  • maxmemory-samples 5 # 设置 Redis 移除 key 时的样本数量, 10 接近 LRU 算法但非常消耗内存, 3 最快却不是精确的

SNAPSHOTTING

  • save 3600 1 300 100 60 10000 # 快照执行机制, 3600 秒后如果超过 1 次更改, 300 秒后超过 100 次更改, 60 秒后超过 10000 次更改
1
save <seconds> <changes> [<seconds> <changes> ...]
  • stop-writes-on-bgsave-error yes # 是否开启停止在保存快照发生错误的时的写操作
  • rdbcompression yes # 开启 rdb 文件压缩
  • rdbchecksum yes # 开启 rdb 文件的校验检查

SECURITY

  • acllog-max-len 128 # ACL 日志在内存中时的最大条目数
  • aclfile /etc/redis/users.acl # 默认 ACL 配置文件
  • io-threads 4 # I/O 线程

发布订阅

Redis 发布/订阅(pub/sub)是一种消息通信模式: 发送者(pub)发送消息, 订阅者(sub)接收消息
它采用事件作为基本的通信机制,提供大规模系统所要求的松散耦合的交互模式: 订阅者(如客户端)以事件订阅的方式表达出它有兴趣接收的一个事件或一类事件;发布者(如服务器)可将订阅者感兴趣的事件随时通知相关订阅者
订阅者对一个或多个频道感兴趣,只需接收感兴趣的消息,不需要知道什么样的发布者发布的. 这种发布者和订阅者的解耦合可以带来更大的扩展性和更加动态的网络拓扑

  • 发布者: 无需独占链接, 可以在 publish 发布消息的同时, 使用同一个链接进行其他操作
  • 订阅者: 需要独占链接, 在 subscribe 期间, 以阻塞的方式等待消息

发布消息

  • PUBLISH channel message 给指定的频道发送消息并返回接收到消息的订阅者数量, 0 表示没有订阅者
  • SPUBLISH shardchannel message 给指定的碎片频道发送消息并返回接收到消息的订阅者数量, 0 表示没有订阅者, 7.0.0 支持

普通订阅

  • SUBSCRIBE channel [channel …] 订阅指定频道立即进入阻塞状态等待接收消息
  • UNSUBSCRIBE [channel [channel …]] 根据给定频道取消客户端订阅, 如果未指定则取消所有频道订阅
1
2
3
4
5
6
7
8
9
10
11
12
13
14
15
16
17
18
19
20
21
22
23
24
25
26
27
28
29
30
31
32
33
34
35
36
37
38
39
40
41
42
43
44
45
46
47
48
49
50
51
52
53
54
55
56
57
58
59
# 1
127.0.0.1:6379> SUBSCRIBE first second
Reading messages... (press Ctrl-C to quit)
1) "subscribe"
2) "first"
3) (integer) 1
1) "subscribe"
2) "second"
3) (integer) 2
# 2
127.0.0.1:6379> SUBSCRIBE first third
Reading messages... (press Ctrl-C to quit)
1) "subscribe"
2) "first"
3) (integer) 1
1) "subscribe"
2) "third"
3) (integer) 2
# 3
127.0.0.1:6379> PUBSUB CHANNELS
1) "third"
2) "first"
3) "second"

# 3
127.0.0.1:6379> PUBLISH first 'hello first'
(integer) 2
# 1
127.0.0.1:6379> SUBSCRIBE first second
...
1) "message"
2) "first"
3) "hello first"
# 2
127.0.0.1:6379> SUBSCRIBE first third
...
1) "message"
2) "first"
3) "hello first"

# 3
127.0.0.1:6379> PUBLISH second 'hello second'
(integer) 1
# 1
127.0.0.1:6379> SUBSCRIBE first second
...
1) "message"
2) "second"
3) "hello second"

# 3
127.0.0.1:6379> PUBLISH third 'hello third'
(integer) 1
# 2
127.0.0.1:6379> SUBSCRIBE first third
...
1) "message"
2) "third"
3) "hello third"

模式订阅

  • PSUBSCRIBE pattern [pattern …] 根据给定模式订阅频道立即进入阻塞状态等待接收消息
    • pattern 可以使用正则表达式匹配多个频道
  • PUNSUBSCRIBE [pattern [pattern …]] 根据给定模式取消客户端订阅, 如果未指定则取消所有模式订阅
1
2
3
4
5
6
7
8
9
10
11
12
13
14
15
16
17
18
19
20
21
22
23
24
25
26
27
28
29
30
31
32
33
34
35
36
37
38
39
40
41
42
43
44
45
46
47
48
49
50
51
# 1
127.0.0.1:6379> PSUBSCRIBE __key*__:*
Reading messages... (press Ctrl-C to quit)
1) "psubscribe"
2) "__key*__:*"
3) (integer) 1
# 2
127.0.0.1:6379> PSUBSCRIBE __key*__:*
Reading messages... (press Ctrl-C to quit)
1) "psubscribe"
2) "__key*__:*"
3) (integer) 1
# 3
127.0.0.1:6379> PUBSUB NUMPAT
(integer) 1

# 3
127.0.0.1:6379> PUBLISH __key@__:foo 'hello key at foo'
(integer) 2
# 1
127.0.0.1:6379> PSUBSCRIBE __key*__:*
...
1) "pmessage"
2) "__key*__:*"
3) "__key@__:foo"
4) "hello key at foo"
# 2
127.0.0.1:6379> PSUBSCRIBE __key*__:*
...
1) "pmessage"
2) "__key*__:*"
3) "__key@__:foo"
4) "hello key at foo"

# 3
127.0.0.1:6379> PUBLISH __key@__:bar 'hello key at bar'
(integer) 2
# 1
127.0.0.1:6379> PSUBSCRIBE __key*__:*
...
1) "pmessage"
2) "__key*__:*"
3) "__key@__:bar"
4) "hello key at bar"
# 2
127.0.0.1:6379> PSUBSCRIBE __key*__:*
...
1) "pmessage"
2) "__key*__:*"
3) "__key@__:bar"
4) "hello key at bar"

碎片频道订阅

  • SSUBSCRIBE shardchannel [shardchannel …] 订阅指定的碎片频道, 7.0.0 支持
  • SUNSUBSCRIBE [shardchannel [shardchannel …]] 根据给定碎片频道取消客户端订阅, 如果未指定则取消所有碎片频道订阅, 7.0.0 支持

统计订阅信息

1
2
3
4
5
6
7
8
9
10
11
12
13
14
15
127.0.0.1:6379> PUBSUB HELP
1) PUBSUB <subcommand> [<arg> [value] [opt] ...]. Subcommands are:
2) CHANNELS [<pattern>]
3) Return the currently active channels matching a <pattern> (default: '*').
4) NUMPAT
5) Return number of subscriptions to patterns.
6) NUMSUB [<channel> ...]
7) Return the number of subscribers for the specified channels, excluding
8) pattern subscriptions(default: no channels).
9) SHARDCHANNELS [<pattern>]
10) Return the currently active shard level channels matching a <pattern> (default: '*').
11) SHARDNUMSUB [<shardchannel> ...]
12) Return the number of subscribers for the specified shard level channel(s)
13) HELP
14) Prints this help.
  • PUBSUB CHANNELS [pattern] 返回当前活跃频道列表(不包含使用模式订阅的频道)
  • PUBSUB NUMSUB [channel [channel …]] 返回订阅者的数量(不包含使用模式订阅的频道)
    • 如果不指定 channel 将返回 (empty array)
1
2
3
4
5
6
7
8
127.0.0.1:6379> PUBSUB CHANNELS
1) "conn"

127.0.0.1:6379> PUBSUB NUMSUB hello conn
1) "hello"
2) (integer) 1
3) "conn"
4) (integer) 1
  • PUBSUB NUMPAT 返回订阅者通过模式订阅的频道的数量
1
2
3
4
127.0.0.1:6379> PUBSUB NUMPAT
(integer) 0
127.0.0.1:6379> PUBSUB NUMPAT
(integer) 1
  • PUBSUB SHARDCHANNELS [pattern] 返回当前活动的碎片频道, 未找到返回 empty array, 7.0.0 支持
  • PUBSUB SHARDNUMSUB [shardchannel [shardchannel …]] 返回指定的碎片频道的订阅者数量, 未找到返回 empty arryay, 7.0.0 支持
1
2
3
127.0.0.1:6379> PUBSUB SHARDNUMSUB conn
1) "conn"
2) (integer) 0

Redis Pipelining

当客户端使用流水线发送命令时, 服务器将被迫使用内存对回复进行排队. 因此, 如果需要使用流水线发送大量命令时最好尽量等分分批发送命令

Redis 流水线是一种通过一次发出多个命令而无需等待每个命令的响应来提高性能的技术, 大多数 Redis 客户端都支持流水线.

1
2
3
4
5
6
# 使用 netcat 命令测试
[root@centos7 workspace]# (printf "PING\r\nPING\r\nPING\r\n"; sleep 1) | nc localhost 6379
+PONG
+PONG
+PONG
^C

Redis 编程

Redis 函数

Redis 7.0 以上支持

Redis 函数是临时脚本的进化步骤, 函数提供与脚本相同的核心功能但却是数据库的一流软件工件

Redis 将函数作为数据库的一个组成部分进行管理, 并通过数据持久化和复制确保它们的可用性. 由于函数是数据库的一部分, 因此在使用前声明, 因此应用程序不需要在运行时加载它们, 也不必冒事务中止的风险. 使用函数的应用程序仅依赖于它们的 API, 而不依赖于数据库中的嵌入式脚本逻辑

Redis 函数可以将 Lua 的所有可用功能用于临时脚本, 唯一例外的是 Redis Lua 脚本调试器

Redis 函数还通过启用代码共享来简化开发, 每个函数都属于一个库, 任何给定的库都可以包含多个函数, 库的内容是不可变的, 并且不允许对其功能进行选择性更新. 取而代之的是, 库作为一个整体进行更新, 在一个操作中将它们的所有功能一起更新. 这允许从同一库中的其他函数调用函数, 或者通过使用库内部方法中的公共代码在函数之间共享代码, 这些函数也可以采用语言本机参数

Redis 函数也被持久化到 AOF 文件中, 并从主服务器复制到副本服务器, 因此它们与数据一样可以持久化

Redis 函数的执行是原子的, 函数的执行在其整个时间内阻止所有服务器活动, 类似于事务的语义, 已执行函数的阻塞语义始终适用于所有连接的客户端, 因为运行一个函数会阻塞 Redis 服务器

  • 函数都属于一个库, 任何给定的库都可以包含多个函数
  • 库的内容是不可变的, 并且不允许选择性地更新其函数, 只能将库作为一个整体进行更新
函数命令
  • FUNCTION help 显示 FUNCTION 的帮助信息
1
2
3
4
5
6
7
8
9
10
11
12
13
14
15
16
17
18
19
20
21
22
23
24
25
26
27
28
29
30
31
32
33
34
35
36
37
38
39
40
41
127.0.0.1:6379> FUNCTION help
1) FUNCTION <subcommand> [<arg> [value] [opt] ...]. Subcommands are:
2) LOAD [REPLACE] <FUNCTION CODE>
3) Create a new library with the given library name and code.
4) DELETE <LIBRARY NAME>
5) Delete the given library.
6) LIST [LIBRARYNAME PATTERN] [WITHCODE]
7) Return general information on all the libraries:
8) * Library name
9) * The engine used to run the Library
10) * Library description
11) * Functions list
12) * Library code (if WITHCODE is given)
13) It also possible to get only function that matches a pattern using LIBRARYNAME argument.
14) STATS
15) Return information about the current function running:
16) * Function name
17) * Command used to run the function
18) * Duration in MS that the function is running
19) If no function is running, return nil
20) In addition, returns a list of available engines.
21) KILL
22) Kill the current running function.
23) FLUSH [ASYNC|SYNC]
24) Delete all the libraries.
25) When called without the optional mode argument, the behavior is determined by the
26) lazyfree-lazy-user-flush configuration directive. Valid modes are:
27) * ASYNC: Asynchronously flush the libraries.
28) * SYNC: Synchronously flush the libraries.
29) DUMP
30) Return a serialized payload representing the current libraries, can be restored using FUNCTION RESTORE command
31) RESTORE <PAYLOAD> [FLUSH|APPEND|REPLACE]
32) Restore the libraries represented by the given payload, it is possible to give a restore policy to
33) control how to handle existing libraries (default APPEND):
34) * FLUSH: delete all existing libraries.
35) * APPEND: appends the restored libraries to the existing libraries. On collision, abort.
36) * REPLACE: appends the restored libraries to the existing libraries, On collision, replace the old
37) libraries with the new libraries (notice that even on this option there is a chance of failure
38) in case of functions name collision with another library).
39) HELP
40) Prints this help.
  • FUNCTION DELETE 删除指定的库
  • FUNCTION LIST 查看所有库和函数
1
2
3
4
5
6
7
8
9
10
11
12
127.0.0.1:6379> FUNCTION LIST
1) 1) "library_name"
2) "mylib"
3) "engine"
4) "LUA"
5) "functions"
6) 1) 1) "name"
2) "knockknock"
3) "description"
4) (nil)
5) "flags"
6) (empty array)
  • FCALL function numkeys [key [key …]] [arg [arg …]] 调用注册的函数
  • FCALL_RO function numkeys [key [key …]] [arg [arg …]] 调用注册的只读函数
加载库和函数

每个 Redis 函数都属于一个加载到 Redis 的库, 使用命令 FUNCTION LOAD 将库加载到数据库, 库必须以 shebang 语句开头 #!<engine name> name=<library name>

1
2
3
# 加载一个空库
127.0.0.1:6379> FUNCTION LOAD "#!lua name=mylib\n"
(error) ERR No functions registered
函数注册调用
  • redis.register_function(name, callback, flags, description) 注册函数
    • name 注册的函数名
    • callback 注册的函数
    • flags
      • no-writes 标识脚本只能读取但不能写入
      • allow-oom 标识允许脚本在服务器内存不足(OOM)时执行
      • allow-stable
      • no-cluster 标识脚本在 Redis 集群模式下返回错误, 防止对集群中的节点执行脚本
      • allow-cross-slot-keys 允许脚本从多个 slot 访问密钥
    • description 函数描述
Redis 命令行注册调用
1
2
3
4
5
6
7
8
# 方式1
127.0.0.1:6379> FUNCTION LOAD "#!lua name=mylib\nredis.register_function{function_name='noop', callback=function() end, flags={ 'no-writes' }, description='Does nothing'}"
# 方式2
127.0.0.1:6379> FUNCTION LOAD "#!lua name=mylib\nredis.register_function('knockknock', function() return 'Who\\'s there?' end)"
"mylib"
# 调用
127.0.0.1:6379> FCALL knockknock 0
"Who's there?"
Lua 脚本注册调用
1
2
3
4
5
6
7
8
9
10
11
12
13
14
15
16
17
18
19
20
21
22
23
24
25
26
27
28
29
30
31
32
33
34
35
36
37
38
39
40
41
42
43
44
#!lua name=mylib
--方式1
--[[redis.register_function{
function_name='knockknock',
callback=function() return 'Who\'s there?' end,
flags={ },
description='Does nothing'
}]]--
--方式2
--[[redis.register_function(
'knockknock',
function() return 'Who\'s there?' end
)]]--
local function knockknock()
return 'Who\'s there?'
end

local function my_hset(keys, args)
local key = keys[1]
-- 调用 redis 命令 TIME 获取当前时间戳
local time = redis.call('TIME')[1]
return redis.call('HSET',key, '_last_modified_', time, unpack(args))
end

local function my_hgetall(keys, args)
-- 使用 resp3 协议进行请求应答
redis.setresp(3)
local key = keys[1]
local res = redis.call('HGETALL', key)
res['map']['_last_modified_'] = nil
return res
end

redis.register_function('knockknock', knockknock)
redis.register_function('my_hset', my_hset)
redis.register_function('my_hgetall', my_hgetall)

-- 注册 FCALL_RO 执行的函数
redis.register_function{
function_name='my_hgetall_ro',
callback=my_hgetall,
flags={'no-writes'}
description='read-only hash getall command'
}
1
2
3
4
5
6
7
8
9
10
11
12
13
14
15
16
17
18
19
20
21
22
23
24
25
26
27
28
29
30
31
32
33
34
35
36
37
38
39
[root@centos7 workspace]# cat mylib.lua | redis-cli -x FUNCTION LOAD REPLACE
"mylib"
# 调用注册函数
127.0.0.1:6379> FCALL my_hset 1 hash:zhang name "zhangsan" age 18 addr "beijing"
(integer) 4
127.0.0.1:6379> KEYS *
1) "hash:zhang"
2) "bit:zhang"
3) "xiaoming"
4) "name"

127.0.0.1:6379> FCALL my_hgetall 1 hash:zhang
1) "age"
2) "18"
3) "addr"
4) "beijing"
5) "name"
6) "zhangsan"

# FCALL 调用只读函数 my_hgetall_ro
127.0.0.1:6379> FCALL my_hgetall_ro 1 hash:zhang
1) "age"
2) "18"
3) "addr"
4) "beijing"
5) "name"
6) "zhangsan"

# FCALL_RO 调用普通函数 my_hgetall
127.0.0.1:6379> FCALL_RO my_hgetall 1 hash:zhang
(error) ERR Can not execute a script with write flag using *_ro command.
# FCALL_RO 调用只读函数 my_hgetall_ro
127.0.0.1:6379> FCALL_RO my_hgetall_ro 1 hash:zhang
1) "age"
2) "18"
3) "addr"
4) "beijing"
5) "name"
6) "zhangsan"

Lua 脚本

Redis 允许在服务器上上传和执行 Lua 脚本, 脚本可以采用编程控制结构并在执行时使用大部分命令来访问数据库, 因为脚本在服务器中执行, 所以从脚本中读取和写入数据非常高效.

Redis 保证脚本的原子执行, 在执行脚本时, 所有服务器活动在其整个运行期间都被阻止.

Lua 允许在 Redis 中运行部分应用程序逻辑, 这样的脚本可以跨多个键执行条件更新, 可能以原子方式组合几种不同的数据类型

Lua 脚本由嵌入式执行引擎在 Redis 中执行, 尽管服务器执行它们, 但 EVAL 脚本被视为客户端应用程序的一部分, 这就是它们没有命名、版本化或持久化的原因. 因此, 如果所有脚本丢失, 应用程序可能需要随时重新加载

脚本命令

脚本参数化 为了确保在独立部署和集群部署中正确执行脚本, 脚本访问的所有键名都必须作为输入键参数显式提供

  • EVAL script numkeys key [key …] arg [arg …] 执行 Lua 脚本
    • script 要执行的脚本语句
    • numkeys 指定后续的参数有几个 key
    • key 要操作的键的数量, 在 Lua 脚本中通过 KEYS[1], KEYS[2] 获取
    • arg 参数, 在 Lua 脚本中通过 ARGV[1], ARGV[2] 获取
  • EVAL_RO script numkeys [key [key …]] [arg [arg …]] 只读版本的 EVAL 命令, Redis 7.0 支持
  • EVALSHA sha1 numkeys key [key …] arg [arg …] 使用缓存 Lua 脚本的 sha 执行脚本(SCRIPT LOAD 命令缓存脚本)
  • EVALSHA_RO sha1 numkeys [key [key …]] [arg [arg …]] 只读版本的 EVALSHA 命令, Redis 7.0 支持
1
2
3
4
5
6
7
8
9
10
11
12
13
14
15
16
17
127.0.0.1:6379> EVAL "return 10" 0
(integer) 10
127.0.0.1:6379> EVAL "return ARGV[1]" 0 100
"100"
127.0.0.1:6379> EVAL "return {ARGV[1], ARGV[2]}" 0 100 101
1) "100"
2) "101"
127.0.0.1:6379> EVAL "return {KEYS[1], KEYS[2], ARGV[1], ARGV[2], ARGV[3]}" 2 name age v1 v2
1) "name"
2) "age"
3) "v1"
4) "v2"
127.0.0.1:6379> EVAL "return {1, 2, { 3, 'hello world' } }" 0
1) (integer) 1
2) (integer) 2
3) 1) (integer) 3
2) "hello world"

每次执行脚本都需要重新加载一遍脚本代码, 浪费资源

  • redis.call(command [, arg…]) 执行 redis 命令并返回结果, 如果遇到错误时直接返回给客户端
  • redis.pcall(command [, arg…]) 执行 redis 命令并返回结果, 如果遇到错误时将返回给脚本的执行上下文
1
2
3
4
5
6
127.0.0.1:6379> GET name
"hello world"
127.0.0.1:6379> EVAL "return redis.call('SET', KEYS[1], ARGV[1])" 1 name "hello redis"
OK
127.0.0.1:6379> GET name
"hello redis"
脚本缓存

存储在服务器的脚本专用缓存中, 缓存内容由脚本的 SHA1 摘要作为缓存中的唯一标识

1
2
3
4
5
6
7
8
9
10
11
12
13
14
15
16
17
18
127.0.0.1:6379> SCRIPT help # 脚本帮助命令
1) SCRIPT <subcommand> [<arg> [value] [opt] ...]. Subcommands are:
2) DEBUG (YES|SYNC|NO)
3) Set the debug mode for subsequent scripts executed.
4) EXISTS <sha1> [<sha1> ...]
5) Return information about the existence of the scripts in the script cache.
6) FLUSH [ASYNC|SYNC]
7) Flush the Lua scripts cache. Very dangerous on replicas.
8) When called without the optional mode argument, the behavior is determined by the
9) lazyfree-lazy-user-flush configuration directive. Valid modes are:
10) * ASYNC: Asynchronously flush the scripts cache.
11) * SYNC: Synchronously flush the scripts cache.
12) KILL
13) Kill the currently executing Lua script.
14) LOAD <script>
15) Load a script into the scripts cache without executing it.
16) HELP
17) Prints this help.
  • SCRIPT FLUSH 从脚本缓存中移除所有脚本, 返回 ok
  • SCRIPT KILL 杀死系统当前正在运行的 Lua 脚本(又名慢脚本)
  • SCRIPT DEBUG 设置脚本内执行时的模式
  • SCRIPT LOAD <script> 将脚本加载到服务器缓存中, 并不立即执行
1
2
3
4
5
6
# 添加 Lua 缓存脚本
127.0.0.1:6379> SCRIPT LOAD "return redis.call('GET', KEYS[1])"
"d3c21d0c2b9ca22f82737626a27bcaf5d288f99f"
# 使用 EVALSHA 执行缓存脚本
127.0.0.1:6379> EVALSHA d3c21d0c2b9ca22f82737626a27bcaf5d288f99f 1 name
"hello redis"
  • SCRIPT EXISTS <script> [script …] 查看缓存中是否存在 sha 对应的脚本, 1 表示存在, 0 表示不存在
1
2
3
4
127.0.0.1:6379> SCRIPT EXISTS d3c21d0c2b9ca22f82737626a27bcaf5d288f99f
1) (integer) 1
127.0.0.1:6379> SCRIPT EXISTS d3c21d0c2b9ca22f82737626a27bcaf5d288f99g
1) (integer) 0
脚本复制

一般在集群部署环境下, Redis 确保脚本执行的所有写操作也被发送到副本以保持一致性, 脚本复制有两种概念

  • 逐字复制: master 将脚本的源代码发送到 slave, 然后 slave 执行脚本并写入效果.
    • 在短脚本生成许多命令的情况下, 可以节省资源, 但意味着 slave 会重做 master 完成的相同工作而浪费资源
  • 效果复制: 仅复制脚本的数据修改命令, slave 然后执行命令而不执行任何脚本, 从 redis 5.0 开始为默认模式

脚本效果复制 —— 复制命令

在这种模式下,在执行 Lua 脚本的同时, Redis 会收集 Lua 脚本引擎执行的所有实际修改数据集的命令, 当脚本执行完成时, 脚本生成的命令序列被包装到一个 事务 中并发送到副本和 AOF

Lua API
  • 使用未声明为本地的变量和函数会引起 Redis 的报错
  • 沙盒执行上下文不支持使用导入的 Lua 模块
全局变量
  • KEYS 获取脚本声明的键参数
  • ARGV 获取脚本声明的键参数剩余的参数
  • redis 单例实例, 使脚本能够与运行它的 Redis 服务器进行交互
Redis 实例 API
1
2
3
4
5
6
7
8
9
# 返回错误信息
127.0.0.1:6379> EVAL "return redis.error_reply('ERR This is a special error')" 0
(error) ERR This is a special error

# 修改默认返回值
127.0.0.1:6379> EVAL "return { ok = 'TICK' }" 0
"TICK"
127.0.0.1:6379> EVAL "return redis.status_reply('TOCK')" 0
"TOCK"
  • redis.sha1hex(x) 返回单个字符串参数的 SHA1 十六进制摘要信息
  • redis.log(level, message) 写入 Redis 服务器日志
    • redis.LOG_DEBUG 日志级别
    • redis.LOG_VERBOSE 日志级别
    • redis.LOG_NOTICE 日志级别
    • redis.LOG_WARNING 日志级别
1
2
3
127.0.0.1:6379> EVAL "return redis.sha1hex('')" 0
"da39a3ee5e6b40d3255bfef95601890afd80709"
127.0.0.1:6379> EVAL "return redis.log(redis.LOG_WARNING, 'Something is terribly wrong')" 0
  • redis.setresp(x) 设置执行脚本和服务器之间的请求应答协议, 默认值 2. Redis 6.0 支持
  • redis.breakpoint() 在使用 Redis Lua 调试器时触发断点
  • redis.debug(x) 在 Redis Lua 调试器控制台中打印其参数
  • redis.acl_check_cmd(command [,arg…]) 用于检查运行脚本的当前用户是否具有使用给定参数执行给定命令的 ACL 权限, 返回值布尔类型. Redis 7.0 支持
  • redis.register_function(name, callback, flags, description) Redis 7.0 支持
  • redis.REDIS_VERSION 以字符串形式返回当前 Redis 服务器版本, 格式 MM.mm.PP. Redis 7.0 支持
  • redis.REDIS_VERSION_NUM 以数字形式返回当前 Redis 服务器版本, 格式为十进制值. Redis 7.0 支持
1
2
3
4
127.0.0.1:6379> EVAL "return redis.REDIS_VERSION" 0
"7.0.5"
127.0.0.1:6379> EVAL "return redis.REDIS_VERSION_NUM" 0
(integer) 458757

数据类型转换

RESP2
  • RESP2 -> Lua
    • RESP2 整数 -> Lua 数
    • RESP2 批量字符串 -> Lua 字符串
    • RESP2 数组 -> Lua 表(可能嵌套额其他 Redis 数据类型)
    • RESP2 状态 -> 包含状态字符串的单个 ok 字段的 Lua 表
    • RESP2 错误 -> 包含错误字符串的单个 err 字段的 Lua 表
    • RESP 空批量|空多批量 -> Lua false 布尔类型
  • Lua -> RESP2
    • Lua 数字 -> RESP2 整数(数字转为整数, 舍去小数部分)
    • Lua 字符串 -> RESP 批量字符串
    • Lua 表(索引, 非关联数组) -> RESP2 数组(在表中遇到第一个 nil 时截断)
    • 带有单个 ok 字段的 Lua 表 -> RESP2 状态
    • 带有单个 err 字段的 Lua 表 -> RESP2 错误
    • Lua false 布尔类型 -> RESP2 空批量
    • Lua true 布尔类型 -> RESP2 整数 1
1
2
3
4
5
6
7
8
9
10
11
12
127.0.0.1:6379> EVAL "return {1, 2, {3, 'hello world'}, 'bar'}" 0
1) (integer) 1
2) (integer) 2
3) 1) (integer) 3
2) "hello world"
4) "bar"
# 忽略表中的 键、数值的小数部分,nil 处截断
127.0.0.1:6379> EVAL "return {1, 2, 3.33, somekey = 'somevalue', 'foo', nil, 'bar'}" 0
1) (integer) 1
2) (integer) 2
3) (integer) 3
4) "foo"
RESP3

一旦 Redis 的回复采用 RESP3 协议, 所有 RESP2 到 Lua 的转换规则都适用, 并添加以下内容

  • RESP3 -> Lua
    • RESP3 map -> 带有单个映射字段的 Lua 表, 其中包含表示映射字段和值的 Lua 表
    • RESP3 set -> 具有单个集合字段的 Lua 表
    • RESP3 null -> Lua nil
    • RESP3 true -> Lua true 布尔类型
    • RESP3 false -> Lua false 布尔类型
    • RESP3 浮点数 -> 带有一个浮点数字段的 Lua 表
    • RESP3 大数字 -> 带有单个大数字字段的 Lua 表. Redis 7.0 支持
    • RESP3 逐句逐字字符串 -> Lua 表, 其中包含单个 verbatim_string 字段的 Lua 表, 其中包含两个字段 string 和 format,分别表示 verbatim string 和它的格式. Redis 7.0 支持
  • Lua -> RESP3
    • Lua Boolean -> RESP3 Boolean
    • 将单个映射字段设置为关联 Lua 表的 Lua 表 -> RESP3 map
    • 将单个集合字段设置为关联 Lua 表的 Lua 表 -> RESP3 set, 值可以为任何值, 都会被丢弃
    • 带有单个浮点数字段的 Lua 表到关联的 Lua 表 -> RESP3 浮点数
    • Lua nil -> RESP3 null

外部库

struct
  • struct.pack(x) 返回一个结构编码的字符串, 接收一个结构格式字符串作为第一个参数, 后面是要编码的值
1
2
3
4
5
6
7
8
9
10
11
12
13
14
15
16
17
18
19
20
21
22
127.0.0.1:6379> EVAL "return struct.pack('bb', 1, 2)" 0
"\x01\x02"
127.0.0.1:6379> EVAL "return struct.pack('BB', 1, 2)" 0
"\x01\x02"
127.0.0.1:6379> EVAL "return struct.pack('B', 1, 2)" 0
"\x01"
127.0.0.1:6379> EVAL "return struct.pack('xB', 1, 2)" 0
"\x00\x01"
127.0.0.1:6379> EVAL "return struct.pack('xBx', 1, 2)" 0
"\x00\x01\x00"
127.0.0.1:6379> EVAL "return struct.pack('xBxx', 1, 2)" 0
"\x00\x01\x00\x00"
127.0.0.1:6379> EVAL "return struct.pack('xBxxH', 1, 2)" 0
"\x00\x01\x00\x00\x02\x00"
127.0.0.1:6379> EVAL "return struct.pack('BxxH', 1, 2)" 0
"\x01\x00\x00\x02\x00"
127.0.0.1:6379> EVAL "return struct.pack('Bxxh', 1, 2)" 0
"\x01\x00\x00\x02\x00"
127.0.0.1:6379> EVAL "return struct.pack('BxxB', 1, 2)" 0
"\x01\x00\x00\x02"
127.0.0.1:6379> EVAL "return struct.pack('Bxxl', 1, 2)" 0
"\x01\x00\x00\x02\x00\x00\x00\x00\x00\x00\x00"
  • struct.unpack(x) 返回结构的解码值, 接收一个结构格式字符串作为第一个参数, 然后是编码结构的字符串
1
2
3
4
5
6
7
8
127.0.0.1:6379> EVAL "return {struct.unpack('BxxH', ARGV[1])}" 0 "\x01\x00\x00\x02\x00"
1) (integer) 1
2) (integer) 2
3) (integer) 6
127.0.0.1:6379> EVAL "return {struct.unpack('BB', ARGV[1])}" 0 "\x01\x02"
1) (integer) 1
2) (integer) 2
3) (integer)
  • struct.size(x) 返回结构的大小(以字节为单位), 接收结构格式字符串作为唯一参数
1
2
3
4
5
6
7
8
9
10
11
12
127.0.0.1:6379> EVAL "return struct.size('b')" 0
(integer) 1
127.0.0.1:6379> EVAL "return struct.size('B')" 0
(integer) 1
127.0.0.1:6379> EVAL "return struct.size('h')" 0
(integer) 2
127.0.0.1:6379> EVAL "return struct.size('H')" 0
(integer) 2
127.0.0.1:6379> EVAL "return struct.size('l')" 0
(integer) 8
127.0.0.1:6379> EVAL "return struct.size('L')" 0
(integer) 8
结构格式
  • > 大端
  • < 小端
  • ![num] 结盟
  • x 填充
  • b/B 有/无符号字节
  • h/H 有/无符号短
  • l/L 有/无符号长
  • T 大小
  • i/In 大小为 n 的有/无符号整数(默认为 int 的大小)
  • cn n 个字符的序列, 打包时, n ==0 表示整个字符串, 解包时, n == 0 表示使用先前读取的数字作为字符串的长度
  • s 零终止字符串
  • f float
  • d double
  • (space) 忽略
cjson

cjson 库提供了来自 Lua 的快速 JSON 编码和解码

  • cjson.encode(x) 返回作为其参数提供的 Lua 数据类型的 JSON 编码字符串
  • cjson.decode(x) 从作为其参数提供的 JSON 编码字符串返回 Lua 数据类型
1
2
3
4
5
6
7
8
9
10
11
12
13
127.0.0.1:6379> EVAL "return cjson.encode({ 1, 2, 'foo', 'bar' })" 0
"[1,2,\"foo\",\"bar\"]"
127.0.0.1:6379> EVAL "return cjson.encode({ 1, 2, 3.33, 'foo', 'bar' })" 0
"[1,2,3.33,\"foo\",\"bar\"]"
127.0.0.1:6379> EVAL "return cjson.encode({ ['foo'] = 'bar' })" 0
"{\"foo\":\"bar\"}"
127.0.0.1:6379> EVAL "return cjson.encode({ ['foo'] = 'bar', ['fov'] = 'baz' })" 0
"{\"fov\":\"baz\",\"foo\":\"bar\"}"

127.0.0.1:6379> EVAL "return cjson.decode(ARGV[1])[4]" 0 "[1,2,3.33,\"foo\",\"bar\"]"
"foo"
127.0.0.1:6379> EVAL "return cjson.decode(ARGV[1])['fov']" 0 "{\"fov\":\"baz\",\"foo\":\"bar\"}"
"baz"
cmsgpack

cmsgpack 库提供了来自 Lua 的快速 MessagePack 编码和解码

  • cmsgpack.pack(x) 返回作为参数给出的 Lua 数据类型的压缩字符串编码
  • cmsgpack.unpack(x) 返回解码其输入字符串参数的解压缩值
1
2
3
4
5
6
7
127.0.0.1:6379> EVAL "return cmsgpack.pack({'foo', 'bar', 'baz', 'hello'})" 0
"\x94\xa3foo\xa3bar\xa3baz\xa5hello"
127.0.0.1:6379> EVAL "return cmsgpack.unpack(ARGV[1])" 0 "\x94\xa3foo\xa3bar\xa3baz\xa5hello"
1) "foo"
2) "bar"
3) "baz"
4) "hello"
bit

bit 提供对数字的按位运算

  • bit.tobit(x)` 将数字格式化为位运算的数值范围并返回
  • bit.tohex(x [, n]) 将第一个参数转换为十六进制并返回, 第二个参数的绝对值控制返回值的数量
1
2
3
4
5
127.0.0.1:6379> EVAL "return bit.tobit(1)" 0
(integer) 1

127.0.0.1:6379> EVAL "return bit.tohex(422342)" 0
"000671cd"
  • bit.bnot(x) 返回其参数的按位非运算
  • bit.bor(x1 [, x2…]) 返回其所有参数的按位或运算
  • bit.band(x1 [, x2…]) 返回其所有参数的按位与运算
  • bit.bxor(x1 [, x2…]) 返回其所有参数的按位异或运算
1
2
3
4
5
6
7
8
9
10
11
12
13
14
15
16
17
18
19
20
21
22
23
24
25
26
27
# 0000 1100 12
# !
# 1111 0011 -13
127.0.0.1:6379> EVAL "return bit.bnot(12)" 0
(integer) -13
# 0010 0000 32
# !
# 1101 1111 -33
127.0.0.1:6379> EVAL "return bit.bnot(32)" 0
(integer) -33

127.0.0.1:6379> EVAL "return bit.bor(1,2,4,8,16,32,64)" 0
(integer) 127

# 0100 1010 74
# 0000 1100 12
# &
# 0000 1000 8
127.0.0.1:6379> EVAL "return bit.band(12, 74)" 0
(integer) 8

# 0100 1010 74
# 0000 1100 12
# ^
# 0100 0110 70
127.0.0.1:6379> EVAL "return bit.bxor(12, 74)" 0
(integer) 70
  • bit.lshift(x, n) 返回第一个参数按位左移 n 位的结果
  • bit.rshift(x, n) 返回第一个参数按位右移 n 位的结果
  • bit.arshift(x, n) 返回第一个参数按位算术右移 n 位的结果, 不改变符号位的移位操作
1
2
3
4
5
6
7
8
9
10
11
12
13
14
15
16
17
18
19
20
21
127.0.0.1:6379> EVAL "return bit.lshift(1, 3)" 0
(integer) 8
127.0.0.1:6379> EVAL "return bit.lshift(2, 1)" 0
(integer) 4
127.0.0.1:6379> EVAL "return bit.lshift(3, 2)" 0
(integer) 12
127.0.0.1:6379> EVAL "return bit.rshift(1, 1)" 0
(integer) 0
127.0.0.1:6379> EVAL "return bit.rshift(2, 1)" 0
(integer) 1
127.0.0.1:6379> EVAL "return bit.rshift(3, 1)" 0
(integer) 1
127.0.0.1:6379> EVAL "return bit.arshift(10, 1)" 0
(integer) 5
127.0.0.1:6379> EVAL "return bit.arshift(128, 1)" 0
(integer) 64

127.0.0.1:6379> EVAL "return bit.rshift(-12, 1)" 0
(integer) 2147483642
127.0.0.1:6379> EVAL "return bit.arshift(-12, 1)" 0
(integer) -6
  • bit.rol(x, n) 按第二个参数给定的位数返回其第一个参数的按位左旋转
  • bit.ror(x, n) 按第二个参数给定的位数返回其第一个参数的按位右旋转
1
2
3
4
5
6
7
8
9
10
11
12
13
127.0.0.1:6379> EVAL "return bit.rol(12, 1)" 0
(integer) 24
127.0.0.1:6379> EVAL "return bit.rol(12, 2)" 0
(integer) 48
127.0.0.1:6379> EVAL "return bit.rol(12, 6)" 0
(integer) 768

127.0.0.1:6379> EVAL "return bit.ror(12, 1)" 0
(integer) 6
127.0.0.1:6379> EVAL "return bit.ror(12, 4)" 0
(integer) -1073741824
127.0.0.1:6379> EVAL "return bit.ror(12, 6)" 0
(integer) 805306368
  • bit.bswap(x) 交换其参数的字节并返回它, 可用于将小端 32 位数字转换位大端 32 位数字, 反之亦然
1
2
3
4
5
6
127.0.0.1:6379> EVAL "return bit.bswap(1)" 0
(integer) 16777216
127.0.0.1:6379> EVAL "return bit.bswap(2)" 0
(integer) 33554432
127.0.0.1:6379> EVAL "return bit.bswap(12)" 0
(integer) 201326592

ACL

ACL(access control list)访问控制列表的简称, 是为了控制某些 Redis 客户端在访问 Redis 服务器时, 能够执行的命令和能够获取的 key, 提高操作安全性, 避免对数据造成损坏

  • ACL HELP 显示 ACL 的帮助信息
1
2
3
4
5
6
7
8
9
10
11
12
13
14
15
16
17
18
19
20
21
22
23
24
25
26
27
28
29
30
127.0.0.1:6379> ACL HELP
1) ACL <subcommand> [<arg> [value] [opt] ...]. Subcommands are:
2) CAT [<category>]
3) List all commands that belong to <category>, or all command categories
4) when no category is specified.
5) DELUSER <username> [<username> ...]
6) Delete a list of users.
7) DRYRUN <username> <command> [<arg> ...]
8) Returns whether the user can execute the given command without executing the command.
9) GETUSER <username>
10) Get the user\'s details.
11) GENPASS [<bits>]
12) Generate a secure 256-bit user password. The optional `bits` argument can
13) be used to specify a different size.
14) LIST
15) Show users details in config file format.
16) LOAD
17) Reload users from the ACL file.
18) LOG [<count> | RESET]
19) Show the ACL log entries.
20) SAVE
21) Save the current config to the ACL file.
22) SETUSER <username> <attribute> [<attribute> ...]
23) Create or modify a user with the specified attributes.
24) USERS
25) List all the registered usernames.
26) WHOAMI
27) Return the current connection username.
28) HELP
29) Prints this help.

规则分类

参数 说明
on 启用用户, 默认为 off
off 禁用用户
+<command> 将命令添加到用户可以调用的命令列表中
-<command> 将命令从用户可以调用的命令列表中移除
+<command>|subcmd 允许使用已禁用命令的特定子命令
+@<category> 允许用户调用 category 类别中的所有命令, 可以使用 ACL CAT 命令查看所有类别
-@<category> 禁止用户调用 category 类别中的所有命令
allcommands +@all 的别名
nocommands -@all 的别名
~<pattern> 允许用户可以访问的 key(正则匹配), 例如: ~foo:* 只允许访问 foo:* 的 key
%R~<pattern> 添加指定的只读 key(正则匹配), 例如: %R~app:* 只允许读 app:* 的 key, 7.0 支持
%W~<pattern> 添加指定的只写 key(正则匹配), 例如: %W~app:* 只允许写 app:* 的 key, 7.0 支持
%RW~<pattern> 添加指定的可读可写的 key(正则匹配), 例如: %RW~app:* 只允许读写 app:* 的 key, 7.0 支持
allkeys ~* 的别名
resetkeys 移除所有的 key 匹配模式
&<pattern> 允许用户可使用的 Pub/Sub 通道(正则匹配)
allchannels &* 的别名
resetchannels 移除所有的通道匹配模式
><password> 为用户添加明文密码, 服务器自动转换成 hash 存储, 例如: >123456
<<password> 从有效密码列表中删除密码
#<hash> 为用户添加 hash 密码, 例如: #cab3…c4f2
!<hash> 从有效密码列表中删除密码
nopass 删除所有与用户关联的密码
resetpass 刷新密码列表并删除 nopass 状态
  • ACL CAT 显示 Redis 的所有分类
1
2
3
4
5
6
7
8
9
10
11
12
13
14
15
16
17
18
19
20
21
22
127.0.0.1:6379> ACL CAT
1) "keyspace"
2) "read"
3) "write"
4) "set"
5) "sortedset"
6) "list"
7) "hash"
8) "string"
9) "bitmap"
10) "hyperloglog"
11) "geo"
12) "stream"
13) "pubsub"
14) "admin"
15) "fast"
16) "slow"
17) "blocking"
18) "dangerous"
19) "connection"
20) "transaction"
21) "scripting"
  • ACL USERS 列出所有已配置用户名
  • ACL WHOAMI 返回当前连接服务器的用户名, 默认 default
1
2
127.0.0.1:6379> ACL WHOAMI
"default"
  • ACL SAVE 将 ACLs 配置项从内存保存到 ACL 文件中

  • ACL DELUSER [username…] 删除指定的 ACL 用户, default 用户不能被删除

  • ACL SETUSER 设置用户访问权限

  • ACL GETUSER username 获取指定用户的权限

1
2
3
4
5
6
7
8
9
10
11
12
13
14
15
16
17
18
19
20
21
22
23
24
25
26
27
28
29
30
31
32
33
34
35
36
37
# 添加 lisi 账号, 明文密码 123456, 添加所有分类的命令
127.0.0.1:6379> ACL SETUSER lisi >123456 off +@all
OK
127.0.0.1:6379> ACL GETUSER lisi
1) "flags"
2) 1) "off"
3) "passwords"
4) 1) "8d969eef6ecad3c29a3a629280e686cf0c3f5d5a86aff3ca12020c923adc6c92"
5) "commands"
6) "+@all"
7) "keys"
8) ""
9) "channels"
10) ""
11) "selectors"
12) (empty array)
# 添加禁用账号 zhangsan
# 只包含 string, hash, list, set分类下的命令
# 只能操作以 zhang 开头匹配模式的 key 和通道
127.0.0.1:6379> ACL SETUSER zhangsan off +@string +@hash +@list +@set ~zhang:* &zhang:*
OK
127.0.0.1:6379> ACL GETUSER zhangsan
1) "flags"
2) 1) "off"
3) "passwords"
4) 1) "8d969eef6ecad3c29a3a629280e686cf0c3f5d5a86aff3ca12020c923adc6c92"
5) "commands"
6) "-@all +@list +@string +@hash +@set"
7) "keys"
8) "~zhang:*"
9) "channels"
10) "&zhang:*"
11) "selectors"
12) (empty array)
# 删除用户的密码
127.0.0.1:6379> ACL SETUSER zhangsan !8d969eef6ecad3c29a3a629280e686cf0c3f5d5a86aff3ca12020c923adc6c92
OK
  • ACL LIST 显示 Redis 服务器当前活动的 ACL 规则
1
2
3
127.0.0.1:6379> ACL LIST
1) "user default on nopass ~* &* +@all"
2) "user zhangsan off ~zhang:* resetchannels &zhang:* -@all +@list +@string +@hash +@set"
  • ACL DRYRUN username command [arg [arg …]] 模拟指定用户对给定命令的执行, 此命令可以用来测试用户的权限而无需启用用户, 7.0.0 支持
1
2
3
4
5
6
7
8
9
127.0.0.1:6379> ACL DRYRUN zhangsan ZADD zs 1 hello 2 world 3 zs
"This user has no permissions to run the 'zadd' command"
127.0.0.1:6379> ACL DRYRUN zhangsan SADD s1 hello world gg s1
"This user has no permissions to access the 's1' key"
127.0.0.1:6379> ACL DRYRUN zhangsan SET name zhangsan
"This user has no permissions to access the 'name' key"
# 只能操作以 zhang 开头匹配模式的 key
127.0.0.1:6379> ACL DRYRUN zhangsan SADD zhang:set hello world s1
OK

事务

=== Redis 单条命令是保证原子性的, 但是 Redis 事务不保证原子性 ===
=== Redis 事务没有隔离级别的概念 ===
所有的命令在事务中, 并没有被执行而是加入队列, 只有发起执行命令的时候才会执行! EXEC

Redis 事务允许在一个步骤中执行一组命令, 事务中的所有命令都是串行化的, 并按顺序执行. 在 Redis 事务执行过程中, 另一个客户端发送的请求将永远不会被处理. 这保证了命令作为一个单独的操作执行
Redis 事务执行的三个重要保证:

  • 批量操作在发送 EXEC 命令前被放入队列缓存
  • 收到 EXEC 命令后进入事务执行, 事务中任意命令执行失败, 其余的命令依然被执行
  • 事务执行过程, 其他客户端提交的命令请求不会插入到事务执行命令序列中

事务开始到执行的三个阶段

  • 开启事务(multi): 使用 MULTI 命令标记从非事务状态切换到事务状态
  • 命令入队: 命令不会被立即执行, 而是被放入一个事务队列
  • 执行事务(exec)或丢弃(discard)

事务命令

  • MULTI 标记一个事务块的开启, 通常返回 ok

  • EXEC 执行事务, 通常返回 ok

    • 必须在 MULTI 命令之后才能调用, 否则报错 ERR EXEC without MULTI
    • 如果 WATCH 观察的 key 在当前的事务执行时已被修改, 则返回 <nil>
  • DISCARD 丢弃事务, 通常返回 ok

    • 必须在 MULTI 命令之后才能调用, 否则报错 ERR DISCARD without MULTI
  • WATCH key [key …] 监视一个或多个 key, 如果在事务执行之前观察的 key 被修改, 则事务将被打断, 通常返回 ok

    • 如果在 MULTI 命令后调用, 则会报错 ERR WATCH inside MULTI is not allowed
  • UNWATCH 取消所有观察的 key, 通常返回 ok, 如果调用了 EXECDISCARD 命令, 通常不再需要调用此命令

1
2
3
4
5
6
7
8
9
10
11
12
13
14
15
16
17
18
127.0.0.1:6379> GET money
"250"
127.0.0.1:6379> WATCH money # 观察 money
OK
127.0.0.1:6379> MULTI # 开启事务
OK
# 修改 money 加上增量 1000 命令入事务队列
127.0.0.1:6379(TX)> INCRBY money 1000
QUEUED
###################################
# 另一个客户端连接修改 money 加上增量 50
127.0.0.1:6379> INCRBY money 50
(integer) 300
###################################
127.0.0.1:6379(TX)> EXEC # 执行事务
(nil)
127.0.0.1:6379> GET money
"300"

编译时错误

1
2
3
4
5
6
7
8
9
10
11
12
13
14
15
127.0.0.1:6379> SET key1 hello
OK
127.0.0.1:6379> MULTI # 开启事务
OK
# 此处的错误在命令加入事务队列时发现, 直接报告, 导致整个事务的执行失败
127.0.0.1:6379(TX)> INCR key1 10
(error) ERR wrong number of arguments for 'incr' command
127.0.0.1:6379(TX)> GET key2 key2 # 命令入队列
QUEUED
127.0.0.1:6379(TX)> GET key2
QUEUED
127.0.0.1:6379(TX)> EXEC # 执行事务
(error) EXECABORT Transaction discarded because of previous errors.
127.0.0.1:6379> GET key2
(nil)

运行时错误

1
2
3
4
5
6
7
8
9
10
11
12
13
14
15
16
17
18
127.0.0.1:6379> MULTI # 开启事务
OK
127.0.0.1:6379(TX)> SET key1 hello # 命令入队列
QUEUED
# 此处的错误在命令运行时才能发现, 但不影响下面的命令的执行
127.0.0.1:6379(TX)> INCR key1
QUEUED
127.0.0.1:6379(TX)> SET key2 key2
QUEUED
127.0.0.1:6379(TX)> GET key2 # 命令执行成功
QUEUED
127.0.0.1:6379(TX)> EXEC # 执行事务
1) OK
2) (error) ERR value is not an integer or out of range
3) OK
4) "key2"
127.0.0.1:6379> GET key2
"key2"

不支持回滚

  • Redis 命令只会因为错误的语法而失败(并且这些问题不能在入队时发现), 或是命令用在了错误类型的键上: 从实用性的角度来说, 失败的命令是由编程错误造成的, 而这些错误应该在开发环境中被发现, 不应该出现在生产环境中
  • 因为不需要对回滚进行支持, 所有 Redis 的内部可以保持简单且快速

持久化

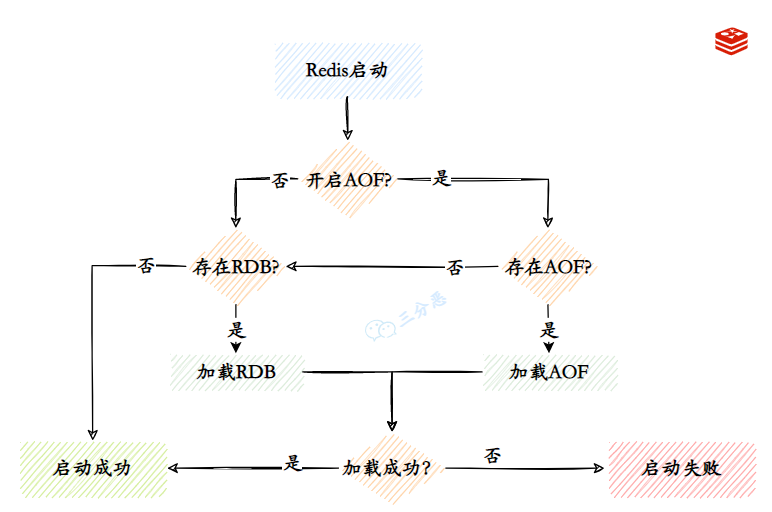
Redis 是基于内存的数据库, 遇到断电就会丢失数据, 持久化就是将内存中的数据保存到磁盘中便于以后使用, Redis 提供了 RDB 和 AOF 两种持久化方式, 默认使用 RDB 方式持久化数据
Redis 在持久化的过程中, 会先将数据写入到一个临时的文件中, 待持久化过程结束后, 才会用这个临时文件替换赏赐持久化生成的文件

redis-4

触发方式

  • 通过 FLUSHALL/FLUSHDB 命令主动触发

  • 通过 SAVE/BGSAVE 命令主动触发

  • 通过配置文件定期触发持久化操作

1
2
3
4
5
# redis 7.0 写法
# 3600秒至少有 1 次修改, 300秒至少有 100 次修改, 60秒至少有 10000 次修改
save 3600 1 300 100 60 10000

# save "" 禁用 RDB, 但仍然可以使用 SAVE 和 BGSAVE 命令生成 RDB 文件

RDB

RDB(Redis Database), 在指定的时间间隔以指定的次数将内存中的数据集以快照的方式写入一个二进制文件中, 然后保存到磁盘中, 也就是 snapshot 快照, 默认生成的文件为 dump.rdb
Redis 会单独 fork 一个子进程进行持久化, 而主进程不会进行任何 I/O 操作, 这样就保证了 Redis 极高的性能, 如果需要进行大规模数据的恢复,且对于数据恢复的完整性不是非常敏感, 此方式比 AOF 方式更加的高效

  • dbfilename dump.rdb 默认文件名

  • dir ./ 默认存储目录

  • redis-check-rdb 检查 RDB 文件

RDB 优点
  • 每隔一段时间完全备份一次
  • 容灾简单, 可远程传输
  • RDB 最大限度地提高了 Redis 的性能
  • 文件较大时重启和恢复速度要快
RDB 缺点
  • 如果备份时间间隔过长, RDB 会丢失较多的数据, 无法处理实时备份
  • RDB 需要经常 fork() 以便使用子进程在磁盘上持久化, 增加 CPU 的负担

AOF

===如果 appendonly.aof 文件有错误, Redis 服务将会启动失败===

  • redis-check-aof 检查 AOF 文件, --fix 参数修复文件的错误, 通常会丢弃文件中无法识别的命令

AOF(Append Only File), 将执行过的写命令全部记录下来, 在数据恢复时按照从前往后的顺序再将指令都执行一遍

  • appendonly yes 启动 AOF 模式, 默认为 no
  • appendfilename appendonly.aof 默认文件名
  • appenddirname appendonlydir 默认存储目录
  • appendfsync everysec 持久化策略, 每秒钟执行一次, 可以修改为 alwaysno
    • always 每次将新命令附加到 AOF 时, 速度慢, 但是最安全
    • no 将写入策略权交给操作系统, 速度快, 但是不安全
  • no-appendfsync-on-rewrite no AOF 重写期间是否同步, 默认 no

Redis 7.0 支持使用新的 AOF 持久化方式, 包含三个文件, 当触发重写机制时, 自动创建新的基础文件和增量文件

  • 以 appendfilename 为前缀命名的基础文件 appendfilename.*.base.rdb, 基础文件可以是 RDB 或 AOF
  • 以 appendfilename 为前缀命名的增量文件 appendfilename.*.incr.aof, 包含在上一个文件之后应用于数据集的其他命令
  • 以 appendfilename 为前缀命名的清单文件 appendfilename.aof.manifest, 用于追踪文件及其创建和应用的顺序
重写机制
  • auto-aof-rewrite-percentage 100 AOF 重写的基准值, 当达到 100% 时重写
  • auto-aof-rewrite-min-size 64mb 当文件大小达到 64mb 的 100% 时重写

BGREWRITEAOF 命令将会在后台开启 AOF 文件重写进程, 创建一个当前 AOF 文件的更小的优化版本, 如果重写失败不会丢失任何数据, 旧的 AOF 文件也不会受到影响

AOF 优点
  • AOF 更耐用, 可以在几秒钟内完成备份
  • 当数据过大时, Redis 可以在后台自动重写 AOF, 节省空间
  • AOF 实时性更好, 丢失数据更少, 并且支持配置写入策略
AOF 缺点
  • 对于相同的数据集合, AOF 文件通常会比 RDB 文件大
  • 在特定的 fsync 策略下, AOF 会比 RDB 略慢
  • AOF 恢复速度比 RDB 慢

RDB 和 AOF 组合

  • aof-use-rdb-preamble yes 是否开始混合模式, 默认 yes

  • RDB 做全量持久化

  • AOF 做增量持久化
    如果同时开始 RDB 和 AOF 持久化时, Redis 重启时只会加载 AOF 文件, 不会加载 RDB 文件

主从复制

将一台 Redis 服务器的数据,复制到其他的 Redis 服务器. 前者称为主节点(Master/Leader),后者称为从节点(Slave/Follower), 数据的复制是单向的!只能由主节点复制到从节点(主节点以写为主、从节点以读为主)—— 读写分离.
===每台 Redis 服务器都是主节点===
一个主节点可以有 0 个或者多个从节点, 但每个从节点只能有一个主节点

1
2
3
4
5
6
7
8
9
10
11
12
13
127.0.0.1:6379> INFO replication # 当前副本的信息
# Replication
role:master
connected_slaves:0
master_failover_state:no-failover
master_replid:e49c9c650c72cd6e3f369365808da6de6efd3825
master_replid2:0000000000000000000000000000000000000000
master_repl_offset:0
second_repl_offset:-1
repl_backlog_active:0
repl_backlog_size:1048576
repl_backlog_first_byte_offset:0
repl_backlog_histlen:0

作用

  • 数据冗余: 主从复制实现了数据的热备份, 是持久化之外的一种数据冗余的方式
  • 故障恢复: 当主节点故障时, 从节点可以暂时替代主节点提供服务, 是一种服务冗余的方式
  • 负载均衡: 在主从复制的基础上, 配合读写分离, 由主节点进行写操作, 从节点进行读操作, 分担节点的负载; 尤其是在多读少写的场景下, 通过多个从节点分担负载, 提高并发量
  • 高可用(集群)基石: 主从复制还是哨兵和集群能够实施的基础

复制原理

Redis 2.8 以上使用 PSYNC 命令完成同步

  1. 从节点向主节点发送 PSYNC 命令, 如果从节点是首次连接主节点时会触发一次全量复制
  2. 接到 PSYNC 命令的主节点会调用 BGSAVE 命令启动一个新线程创建 RDB 文件, 并使用缓冲区记录接下来执行的所有写命令
  3. 当 RDB 文件生成完毕后, 主节点向所有从节点发送 RDB 文件, 并在发送期间继续记录被执行的写命令
  4. 从节点接收到 RDB 文件后丢弃所有旧数据并载入这个文件
  5. 主节点将缓冲区记录的所有写命令发送给从节点执行
  6. 如果从节点断开连接后重连, 主节点仅将部分缺失的数据同步给从节点
  • 全量复制: 从节点接收到数据库文件后, 将其全部加载到内存中
  • 增量复制: 主节点将新的所有收集到的修改命令依次传给从节点, 完成同步

命令模式

===每台 Redis 服务器都是主节点===, 只用配置从服务器即可

运行时有效, 只在本次服务器运行时有效, 重启服务器后将会丢失配置信息

  • 方式一: 启动 Redis 服务器时使用指定参数 redis-server --port 6380 --replicaof 127.0.0.1 6379
  • 方式二: 连接 Redis 服务器使用内置命令 REPLICAOF host port
1
2
3
4
5
6
7
8
9
10
11
12
13
14
15
16
17
18
19
20
21
# 设置关联主服务器
127.0.0.1:6380> REPLICAOF 127.0.0.1 6379
OK
127.0.0.1:6381> REPLICAOF 127.0.0.1 6379
OK
# 查看主服务器配置信息
127.0.0.1:6379> INFO replication
# Replication
role:master
connected_slaves:2
slave0:ip=127.0.0.1,port=6380,state=online,offset=153689,lag=0
slave1:ip=127.0.0.1,port=6381,state=online,offset=153557,lag=0
master_failover_state:no-failover
master_replid:749aaed3f58b97f7c01d3732a6f6c55be205c4b2
master_replid2:451a270c3954af29f43878dd9bfeac579d011972
master_repl_offset:153689
second_repl_offset:133525
repl_backlog_active:1
repl_backlog_size:1048576
repl_backlog_first_byte_offset:133525
repl_backlog_histlen:20165
1
2
3
4
5
6
7
8
9
10
11
12
13
# 主节点写入数据
127.0.0.1:6379> SET name helloworld
OK
# 从节点读取数据
127.0.0.1:6380> GET name
"helloworld"
127.0.0.1:6380> SET age 18 # 从机写入数据报错
(error) READONLY You can\'t write against a read only replica.
# 从节点读取数据
127.0.0.1:6381> GET name
"helloworld"
127.0.0.1:6381> SET age 18 # 从机写入数据报错
(error) READONLY You can\'t write against a read only replica.

提升从服务器角色

  • REPLICAOF NO ONE 将从服务器更改为主服务器

配置文件模式

永久有效, 但是缺少可扩展性, 每次修改主从节点配置都需要重启 Redis 服务

redis.conf 基础配置,集群配置

1
2
3
4
5
6
7
8
9
10
11
12
13
14
15
16
17
18
19
20
21
22
23
24
25
26
27
28
29
30
31
32
33
34
35
36
37
38
39
40
41
42
43
44
45
46
47
48
49
50
51
52
53
54
55
56
57
58
59
60
61
62
63
64
65
66
67
68
69
70
71
72
73
74
75
76
77
78
79
80
81
82
83
84
85
86
87
88
89
90
91
92
93
94
95
96
97
98
99
100
101
102
103
104
105
106
107
108
109
110
111
112
113
114
115
# 引入 redis 默认配置文件
include /root/redis-cluster/redis.conf
# 修改绑定 ip, 此处演示全为本机
bind 127.0.0.1
# 修改 redis 端口号, 本机演示需要修改, 多机器时可以不用
port 6379
# 关闭保护模式, 默认 yes
protected-mode no
# 开启后台运行, 默认 no
daemonize yes
# 修改 redis 进程文件名
pidfile /var/run/redis_6379.pid

loglevel notice
# 修改日志文件名, 默认为空
# 守护进程模式将指定 /dev/null
logfile "/temp/log/6379.log"
# 修改持久化文件名, 默认为 dump.rdb
dbfilename dump6379.rdb

# 是否在未开启持久化模式下删除复制中使用的 RDB 文件, 默认 no
# rdb-del-sync-files no

dir "" # 持久化文件存放目录
# 配置主服务器 ip 和 port
# replicaof <masterip> <masterport>

# 副本和主服务器同步时的认证密码, 如果主服务器开启验证
# masterauth <master-password>
# 副本和主服务器同步时的认证用户
# 如果主服务器使用 requirepass 配置项, 则必须配置此项
# masteruser <username>

# 从节点只读模式, 默认 yes
# replica-read-only yes
# 不使用向磁盘写 rdb 文件通信的方式直接通过新建进程 socket 同步 rdb 文件, 默认 yes
# repl-diskless-sync yes
# 同步延迟, 默认 5 sec
# repl-diskless-sync-delay 5

# 主服务器发送 PING 指令到副本的平均时间间隔, 默认 10 sec
# repl-ping-replica-period 10

# 副本的超时时间, 默认 60 sec
# 确保此项值大于 repl-ping-replica-period 的值, 否则
# 每当主服务器和副本之间的流量较低时,都会检测到超时
# repl-timeout 60

# 如果设置为 yes, Redis 将使用更小的 tcp 包和更少的带宽同步数据
# 主从同步延迟取决于Linux 内核的配置默认 40 毫秒一次
# 是否关闭主从节点同步的无延迟, 默认 no
# repl-disable-tcp-nodelay no

# 哨兵模式下被选为主服务器的优先级, 值越小优先级越高, 默认 100
# replica-priority 100

# 默认情况哨兵模式下所有副本被包含在报告中
# 设置为 no 表示报告中不包含副本
# 但不影响被选举为 master 的优先级
# replica-announced yes

# 副本用于监听 master 连接副本的 ip 和 端口
# 可以被 master 自动检测到
# replica-announce-ip 5.5.5.5
# replica-announce-port 1234

# 支持存储最多的 key 的数量, 默认 1000000
# tracking-table-max-keys 1000000
# 支持同时最多连接的客户端数量, 默认 10000
# maxclients 10000

# 最大内容
# maxmemory <bytes>

# 副本忽略最大内存限制
# replica-ignore-maxmemory yes

# 从 Redis 6.0 开始作为新 ACL 系统之上的一个兼容配置
# 该选项将只是为默认用户设置密码
# 客户端仍需要使用 AUTH [username] password 进行身份认证
# requirepass foobared

# 主服务器关机时副本的最大等待时间, 默认 10 sec
# shutdown-timeout 10

# 高级配置
# 哈希类型元素的个数小于 512 个, 每个元素值都小于 64B 时
# 使用 压缩列表 作为底层数据结构
# 否则使用 哈希表 作为底层数据结构
# hash-max-listpack-entries 512
# hash-max-listpack-value 64

# -2: max size: 8kb
# list-max-listpack-size -2
# 0 表示禁用所有的列表压缩
# list-compress-depth 0

# 集合元素都是整数且元素个数小于 512 个使用 整数集合 作为底层数据结构
# 否则使用 哈希表 作为底层数据结构
# set-max-intset-entries 512
# set-max-listpack-entries 128
# set-max-listpack-value 64

# 有序集合的元素个数小于 128 个并且每个元素的值小于 64B 时
# 使用 压缩列表 作为底层数据结构
# 否则使用 跳表 作为数据结构
# zset-max-listpack-entries 128
# zset-max-listpack-value 64

# HyperLogLog
# hll-sparse-max-bytes 3000

# Streams
# stream-node-max-bytes 4096
# stream-node-max-entries 100
  • requirepass 认证
1
2
3
4
5
6
7
8
9
10
11
12
13
14
15
16
17
18
19
20
# 第一种方式: 连接 redis 后使用内置命令 AUTH 命令认证
[root@centos7 workspace]# redis-cli
127.0.0.1:6379> KEYS *
(error) NOAUTH Authentication required.
127.0.0.1:6379> ACL WHOAMI
(error) NOAUTH Authentication required.
127.0.0.1:6379> AUTH 1006611
OK
127.0.0.1:6379> ACL WHOAMI
"default"

# 第二种方式: 连接 redis 时使用参数认证
[root@centos7 workspace]# redis-cli --user default --pass 1006611
Warning: Using a password with '-a' or '-u' option on the command line interface may not be safe.
127.0.0.1:6379> ACL WHOAMI
"default"
127.0.0.1:6379> KEYS *
1) "hash:zhang"
2) "age"
3) "name"

哨兵模式

哨兵模式是一种特殊的模式, Redis 提供了启动哨兵的工具命令, 哨兵是一个独立的进程运行

  • 哨兵节点通过发送 PING 命令, 监控所有的主(从)节点的反馈运行状态

  • 当哨兵节点监控到 master 掉线并且其它多个哨兵节点确认 master 掉线后, 开始选取 leader 启动故障转移操作执行切换 master, 然后通过发布订阅模式通知其他的从节点, 修改配置文件并关联新的主节点

  • 当 master 重连之后, 哨兵节点自动将 master 节点修改为 slave 模式

  • 不能水平扩容, 不能动态的增、删节点

  • 高可用特性会受到主节点的内存的限制

执行任务

  • 监控: 定期检查主节点和从节点的健康状态, 包括发送 PING 命令、检查返回结果和检测通信故障
  • 自动故障转移: 当一个主节点不能正常工作时, Sentinel 会开始一次自动故障迁移操作, 它会将失效主节点的其中一个从节点升级为新的主节点, 并让失败的主节点的其他从节点改为复制新的主节点. 当客户端试图连接失效的主节点时, 集群也会向客户端返回新的主节点的地址, 使得集群可以使用新主节点代替失效节点
  • 高可用性切换: 选举新的主节点后, 哨兵节点会自动将从节点切换为新的主节点, 并通知其它从节点更新复制目标
  • 配置提供者: 当客户端连接到哨兵节点时, 哨兵节点可以根据 Redis 集群的配置信息, 将其重定向到正确的主节点

选举算法

首先, 领头 sentinel 根据从节点的信号反馈将从节点列表中失联的节点剔除, 按照从节点的优先级(replica-priority)进行排序并选择优先级最高的从节点, 如果有多个具有相同最高优先级的从节点, 那么, 领头 sentinel 将多个具有相同最高优先级的从节点按照复制偏移量(复制积压缓冲区中存储的写操作的字节占用累加, 主从节点进行 PSYNC 使用)进行排序并选择其中偏移量最大(偏移量最大保存的数据最新)的从节点, 如果有多个优先级最高, 复制偏移量最大的从节点, 那么 领头 sentinel 将按照从节点的运行 ID 进行排序并选择其中 ID 最小的从节点

replica-priority > replica-offset > run-ID

配置方式

  • 方式一: 使用命令指定参数 redis-server /path/to/sentinel.conf --sentinel 开启哨兵模式
  • 方式二: 使用命令 redis-sentinel /path/to/sentinel.conf 开启哨兵模式

sentinel.conf 配置文件

1
2
3
4
5
6
7
8
9
10
11
12
13
14
15
16
17
18
19
20
21
22
23
24
25
26
27
28
29
30
31
32
33
34
35
36
37
38
39
40
41
42
43
44
45
46
protected-mode no # 保护模式, 默认不开启
port 26379 # 服务端口号
daemonize no # 是否后台运行模式
pidfile /var/run/redis-sentinel-26379.pid # 进程文件
# sentinel announce-ip <ip> # 监听指定地址和端口的实例
# sentinel announce-port <port>
logfile "" # 日志文件
dir /tmp # 工作目录

# 监测服务器配置, 数字表示确认主服务器宕机的票数
# sentinel monitor <master-name> <ip> <redis-port> <quorum>
sentinel monitor mymaster 127.0.0.1 6379 2

# 通过本地地址监听外部网络中的 redis
# sentinel announce-ip <ip>
# sentinel announce-port <port>

# 认证配置
# sentinel auth-pass <master-name> <password>

# 不可触达的超时时间, 默认 30 sec
# sentinel down-after-milliseconds <master-name> <milliseconds>
sentinel down-after-milliseconds mymaster 30000

# 功能同 redis.conf 中的配置项
# requirepass <password>

# 配置其他 sentinel 认证的用户, 如果没有配置 sentinel-user
# 将使用 default 用户 和 sentinel-pass 进行认证
# sentinel sentinel-user <username>
# sentinel sentinel-pass <password>

# 当主服务器宕机时支持最大同时重配服务器的数量, 默认 1
# sentinel parallel-syncs <master-name> <numreplicas>
sentinel parallel-syncs mymaster 1

# 当服务器宕机后等待再次重启的时间, 默认 3 min
# sentinel failover-timeout <master-name> <milliseconds>
sentinel failover-timeout mymaster 180000

# 服务器唤起脚本文件
# sentinel notification-script <master-name> <script-path>
sentinel notification-script mymaster /var/redis/notify.sh

# 拒绝脚本配置, 默认 yes
sentinel deny-scripts-reconfig yes

redis-2
redis-3

一主三从哨兵配置

  • 3 个哨兵配置
1
2
3
4
5
6
7
8
9
10
11
12
13
14
15
16
17
18
19
20
# sentinel26379.conf
port 26379
pidfile /var/run/redis-sentinel-26379.pid
logfile "/tmp/log/redis_26379.log"
dir /tmp
sentinel monitor myredis 127.0.0.1 6379 2

# sentinel36379.conf
port 36379
pidfile /var/run/redis-sentinel-36379.pid
logfile "/tmp/log/redis_36379.log"
dir /tmp
sentinel monitor myredis 127.0.0.1 6379 2

# sentinel46379.conf
port 46379
pidfile /var/run/redis-sentinel-46379.pid
logfile "/tmp/log/redis_46379.log"
dir /tmp
sentinel monitor myredis 127.0.0.1 6379 2
  • 3 台 redis 服务器配置
1
2
3
4
5
6
7
8
9
10
11
12
13
14
15
16
17
18
19
20
21
22
23
24
25
26
27
28
29
30
# redis6379.conf
bind 127.0.0.1
port 6379
daemonize yes
pidfile /var/run/redis_6379.pid
logfile "/tmp/log/redis_6379.log"
dir /tmp
dbfilename dump6379.rdb

# redis6380.conf
bind 127.0.0.1
port 6380
daemonize yes
pidfile /var/run/redis_6380.pid
logfile "/tmp/log/redis_6380.log"
dir /tmp
dbfilename dump6380.rdb
# 配置主服务器 ip 和 port
replicaof 127.0.0.1 6379

# redis6381.conf
bind 127.0.0.1
port 6381
daemonize yes
pidfile /var/run/redis_6381.pid
logfile "/tmp/log/redis_6381.log"
dir /tmp
dbfilename dump6381.rdb
# 配置主服务器 ip 和 port
replicaof 127.0.0.1 6379
  • 根据配置文件启动所有服务
1
2
3
4
5
6
[root@centos7 ~]# redis-server .config/redis6379.conf # 启动 redis 服务器
[root@centos7 ~]# redis-server .config/redis6380.conf # 启动 redis 服务器
[root@centos7 ~]# redis-server .config/redis6381.conf # 启动 redis 服务器
[root@centos7 ~]# redis-sentinel .config/sentinel26379.conf # 启动哨兵
[root@centos7 ~]# redis-sentinel .config/sentinel36379.conf # 启动哨兵
[root@centos7 ~]# redis-sentinel .config/sentinel46379.conf # 启动哨兵

集群模式

Redis 3.0 支持

Redis Cluster 是一种服务器 Sharding(分片) 技术, Sharding 采用 slot 的概念, 一共分成 16384 个 slot, 对于每个进入 Redis 的键值对, 对 key 执行 CRC16(key) mod 16384 操作, 得到的结果就是对应的 slot.

Redis 集群中的每个 node 负责分摊这 16384 个 slot 中的一部分, 当动态增减 node 时, 需要将 16384 个 slot 再分配, slot 中的键值对也要迁移, 这一过程目前还处于半自动状态仍需要人工介入, 如果某个 node 发生故障, 则此 node 负责的 slot 也就失效, 整个集群将不能工作

官方推荐的方案是将 node 配置成主从结构, 即 1:n, 如果主节点失效, Redis Cluster 根据选举算法从 slave 节点中选择一个升级为主节点继续提供服务, 如果失效的主节点恢复正常后则作为新的主节点的从节点

Cluster Slot

从心跳包的大小、网络带宽、心跳并发、压缩率鞥维度考虑, 16384 个插槽更具有优势且能满足业务需求

  • 正常的心跳数据包携带节点的完整配置, 它能以幂等方式来更新配置. 如果采用 16384 个插槽, 占空间 2KB(16384/8); 如果采用 65536 个插槽,占空间 8KB(65536/8). 8KB 的心跳包看似不大, 比起 16384 个插槽, 头大小增加了 4 倍,ping 消息的消息头太大, 浪费带宽
  • Redis Cluster 不太可能扩展到超过 1000 个主节点, 太多可能导致网络拥堵
  • 16384 个插槽比较合适, 当集群扩展到 1000 个节点时, 也能确保每个主节点有足够的插槽

集群特点

  • 数据自动分片: 集群自动将数据分布到不同的节点上, 实现数据的均衡存储和负载均衡
  • 自动故障转移: 当主节点发生故障时, 集群会自动进行故障检测, 并将从节点升级为新的主节点, 以保证系统的可用性
  • 内部通信协议: 集集群使用 Gossip 协议进行节点之间的通信和状态更新, 确保集群的一致性和高效性
  • 客户端路由: 客户端可以通过集群提供的路由机制, 自动将请求发送到正确的节点上, 实现透明访问
  • 负载均衡: 在 Redis 集群中, 数据和请求会自动分布到不同的节点上, 实现负载均衡, 这样可以避免单个节点过载, 提高系统的稳定性和性能
  • 扩展性好: 通过使用 Redis 集群, 可以便利地扩展系统的容量和性能, 将数据和请求分布到多个节点上, 提高整体系统的吞吐量和承载能力
  • 高可用性: 通过 Redis 集群, 可以将数据分布到多个节点上, 实现数据的冗余备份和容错能力, 当部分节点不可用时, 集群仍然可以继续提供服务, 保证系统的可用性

命令

  • redis-cli --cluster help # 查看集群命令帮助信息

  • redis-cli --cluster create host1:port1 … hostN:portN # 创建指定 IP 和 Port 的服务器作为集群

    • --cluster-replicas <arg> # 指定集群中主节点和从节点数量的比例, 1 表示 1:1
  • redis-cli --cluster add-node new_host:new_port existing_host:existing_port # 添加集群节点

    • --cluster-slave # 添加集群节点从服务器
    • --cluster-master-id <arg> # 添加到指定主服务器下
  • redis-cli --cluster reshard <host:port> # 重新分配节点的 hash 插槽

    • --cluster-from <arg> # 已有节点 id, 多个 id 之间使用半角逗号分隔
    • --cluster-to <arg> # 新节点 id
    • --cluster-slots <arg> # 新节点的 hash 槽数量
  • redis-cli --cluster rebalance <host:port> # 重新分配节点

    • --cluster-weight <node1=w1…nodeN=wN> # 分配节点权重
    • --cluster-timeout <arg> # 节点超时时间
    • --cluster-threshold <arg> # 节点阈值
  • redis-cli --cluster import host:port # 导入指定节点

    • --cluster-from <arg> # 从指定 id
    • --cluster-from-user <arg> # 指定用户名
    • --cluster-from-pass <arg> # 指定密码
  • redis-cli --cluster info <host:port> # 查看指定节点信息

  • redis-cli --cluster check <host:port> # 检查指定节点

  • redis-cli --cluster del-node host:port node_id # 删除集群节点

  • redis-cli --cluster call host:port command arg arg … arg # 集群节点执行指定命令

    • --cluster-only-masters 所有主节点
    • --cluster-only-replicas 所有副本节点
    1
    2
    # 在所有主节点上执行加载的命令
    [root@centos7 workspace]# redis-cli --cluster --cluster-only-masters call host:port FUNCTION LOAD ...
  • redis-cli --cluster set-timeout host:port milliseconds # 设置节点的超时时间

  • redis-cli --cluster backup host:port backup_directory # 备份节点数据到指定目录

使用 redis-cli -c -p port 命令接入集群节点

集群部署

编辑配置文件

创建 Redis 服务器配置文件, 引入默认配置文件并覆盖配置项, 开启集群模式
创建 cluster6379.conf, cluster6380.conf, cluster6381.conf, cluster6382.conf, cluster6383.conf, cluster6384.conf 6 个文件
修改其中的 bind, port, pidfile, cluster-enabled, cluster-config-file

集群配置, 基础配置

1
2
3
4
5
6
7
8
9
10
11
12
13
14
15
16
17
18
19
20
21
22
23
24
25
26
27
28
29
30
31
32
33
34
35
36
37
38
39
40
41
42
43
44
45
46
# # 引入 redis 默认配置文件
# include /root/redis-cluster/redis.conf

cluster-enabled yes # 开启集群模式
# 修改集群节点文件名, 默认在存储在当前目录下
cluster-config-file nodes-6379.conf
# 设置节点失联时间, 超过该时间集群自动切换主从节点, 默认 15000 milsec
cluster-node-timeout 15000

# 集群总线监听 TCP 连接的端口, 默认端口为客户端命令端口+10000(eg: 6379+10000)
# 每个集群节点都需要开放两个端口, 一个(6379)用于客户端的 TCP 连接,
# 另一个(16379)用于节点使用集群总线进行故障监测、配置更新、故障转移等
# cluster-port 0

# (cluster-node-timeout * cluster-replica-validity-factor) + repl-ping-replica-period
# 例如, 集群节点超时为 30 sec, 并且集群副本有效性因子为 10 sec,
# 并且假设默认的 repl-ping-replica-period 为 10 sec,
# 则如果副本无法与主机进行超过 310 sec的通话, 则副本将不会尝试故障转移
# 集群副本有效性因子, 默认 10 sec
# cluster-replica-validity-factor 10

# 允许使用较少的自动集群配置, 默认 yes
# cluster-allow-replica-migration yes

# 默认当某一插槽不可用时, 整个集群都挂掉
# no 表示仅该插槽不可用, 默认 yes
# cluster-require-full-coverage yes

# 允许集群失效的情况下依然可以从节点中读取数据, 保证了高可用性
# 默认 no, 不允许
# cluster-allow-reads-when-down no
# 允许集群服务器宕机时发布/订阅, 默认 yes
# cluster-allow-pubsubshard-when-down yes

# 集群模式使用 hostname 进行节点间通信
# 设置为空字符串表示将删除 hostname 并同步给其他节点
# cluster-announce-hostname ""

# 指定集群模式连接节点的方式是使用 ip、hostname或unknown-endpoint 方式
# 如果设置为 hostname 但未设置 cluster-announce-hostname 将返回 ?
# cluster-preferred-endpoint-type ip

# cluster-announce-ip ip # 集群模式下节点的 ip
# cluster-announce-port 6379 # 集群模式下节点的端口
# cluster-announce-tls-port 0 # 集群模式下节点的安全端口
# cluster-announce-bus-port 16379
启动 Redis 服务器

启动所有的 redis 服务器, 使用 ps -ef | grep redis 命令查看 redis 服务器进程
redis 进程后中括号中的 cluster 表示 redis 工作在集群模式下, 需要进一步配置 redis 的集群关系

1
2
3
4
5
6
7
8
9
10
11
12
13
[root@centos7 redis-cluster]# redis-server cluster6379.conf
[root@centos7 redis-cluster]# redis-server cluster6380.conf
[root@centos7 redis-cluster]# redis-server cluster6381.conf
[root@centos7 redis-cluster]# redis-server cluster6382.conf
[root@centos7 redis-cluster]# redis-server cluster6383.conf
[root@centos7 redis-cluster]# redis-server cluster6384.conf
[root@centos7 redis-cluster]# ps -ef | grep redis
root 3731 1 0 05:49 ? 00:00:00 redis-server 127.0.0.1:6379 [cluster]
root 3737 1 0 05:49 ? 00:00:00 redis-server 127.0.0.1:6380 [cluster]
root 3743 1 0 05:49 ? 00:00:00 redis-server 127.0.0.1:6381 [cluster]
root 3749 1 0 05:49 ? 00:00:00 redis-server 127.0.0.1:6382 [cluster]
root 3755 1 0 05:49 ? 00:00:00 redis-server 127.0.0.1:6383 [cluster]
root 3761 1 0 05:49 ? 00:00:00 redis-server 127.0.0.1:6384 [cluster]
创建集群节点

使用 redis-cli --cluster create --cluster-replicas arg hostN:portN 命令创建集群节点, arg 参数表示集群主从节点的数量比例, 1 表示 1:1
创建过程中提示输入 yes 表示接受当前配置信息并写入指定文件中, 最后输出 [OK] All 16384 slots covered. 表示集群创建完成

1
2
3
4
5
6
7
8
9
10
11
12
13
14
15
16
17
18
19
20
21
22
23
24
25
26
27
28
29
30
31
32
33
34
35
36
37
38
39
40
41
42
43
44
45
46
47
48
49
50
51
52
53
[root@centos7 redis-cluster]# redis-cli --cluster create --cluster-replicas 1 \
> 127.0.0.1:6379 127.0.0.1:6380 127.0.0.1:6381 \
> 127.0.0.1:6382 127.0.0.1:6383 127.0.0.1:6384
>>> Performing hash slots allocation on 6 nodes...
Master[0] -> Slots 0 - 5460
Master[1] -> Slots 5461 - 10922
Master[2] -> Slots 10923 - 16383
Adding replica 127.0.0.1:6383 to 127.0.0.1:6379
Adding replica 127.0.0.1:6384 to 127.0.0.1:6380
Adding replica 127.0.0.1:6382 to 127.0.0.1:6381
>>> Trying to optimize slaves allocation for anti-affinity
[WARNING] Some slaves are in the same host as their master
M: 2b144f1d7bdb31000a519492be980c6634576462 127.0.0.1:6379
slots:[0-5460] (5461 slots) master
M: a770892444fbbe4b7d9391b458ac04d6bcba26f0 127.0.0.1:6380
slots:[5461-10922] (5462 slots) master
M: 76cb8ea9a5d6ba0fa43d31cfa4c33cea8442e07d 127.0.0.1:6381
slots:[10923-16383] (5461 slots) master
S: 6c9823906baa11aba873a798cce3a3b3c95465f2 127.0.0.1:6382
replicates 2b144f1d7bdb31000a519492be980c6634576462
S: 4a56b76a379da615b606a499ae475e986eda3efd 127.0.0.1:6383
replicates a770892444fbbe4b7d9391b458ac04d6bcba26f0
S: eaf9833aa105e36b22f6330585a972239bab9f50 127.0.0.1:6384
replicates 76cb8ea9a5d6ba0fa43d31cfa4c33cea8442e07d
Can I set the above configuration? (type 'yes' to accept): yes
>>> Nodes configuration updated
>>> Assign a different config epoch to each node
>>> Sending CLUSTER MEET messages to join the cluster
Waiting for the cluster to join
.
>>> Performing Cluster Check (using node 127.0.0.1:6379)
M: 2b144f1d7bdb31000a519492be980c6634576462 127.0.0.1:6379
slots:[0-5460] (5461 slots) master
1 additional replica(s)
S: 6c9823906baa11aba873a798cce3a3b3c95465f2 127.0.0.1:6382
slots: (0 slots) slave
replicates 2b144f1d7bdb31000a519492be980c6634576462
M: a770892444fbbe4b7d9391b458ac04d6bcba26f0 127.0.0.1:6380
slots:[5461-10922] (5462 slots) master
1 additional replica(s)
S: eaf9833aa105e36b22f6330585a972239bab9f50 127.0.0.1:6384
slots: (0 slots) slave
replicates 76cb8ea9a5d6ba0fa43d31cfa4c33cea8442e07d
S: 4a56b76a379da615b606a499ae475e986eda3efd 127.0.0.1:6383
slots: (0 slots) slave
replicates a770892444fbbe4b7d9391b458ac04d6bcba26f0
M: 76cb8ea9a5d6ba0fa43d31cfa4c33cea8442e07d 127.0.0.1:6381
slots:[10923-16383] (5461 slots) master
1 additional replica(s)
[OK] All nodes agree about slots configuration.
>>> Check for open slots...
>>> Check slots coverage...
[OK] All 16384 slots covered.
连接 Redis 服务器

使用 redis-cli -c -p port 命令接入集群节点

  • -c 以集群模式接入
1
[root@centos7 redis-cluster]# redis-cli -c -p 6379
集群命令
  • CLUSTER HELP 在 Redis 命令行中查看所有集群操作命令
1
127.0.0.1:6380> CLUSTER HELP
  • CLUSTER INFO
  • CLUSTER SLOTS 返回集群中 hash 槽的详细信息, redis 7.0 开始使用 CLUSTER SHARDS 命令代替
  • CLUSTER REPLICAS <node-id> 列出指定节点的所有副本节点的信息, 功能和 CLUSTER NODES 类似
  • CLUSTER NODES
  • CLUSTER REPLICATE <node-id> 配置当前节点为指定主节点的从节点
  • CLUSTER KEYSLOT <somekey> 计算指定 key 所在的 hash 槽
  • CLUSTER COUNTKEYSINSLOT <slot> 统计集群中 hash 槽中存储的 key 的数量
  • CLUSTER FAILOVER 手动启动集群故障转移操作, 此命令只能发送给集群从节点
  • CLUSTER FLUSHSLOTS 清空当前节点的所有插槽
查看节点信息
  • 方式一: 命令行中使用 redis-cli --cluster info host:port 命令查看指定节点的信息
1
2
3
4
5
6
[root@centos7 redis-cluster]# redis-cli --cluster info 127.0.0.1:6380
127.0.0.1:6380 (a7708924...) -> 3 keys | 5462 slots | 1 slaves.
127.0.0.1:6382 (6c982390...) -> 0 keys | 5461 slots | 0 slaves.
127.0.0.1:6381 (76cb8ea9...) -> 0 keys | 5461 slots | 1 slaves.
[OK] 3 keys in 3 masters.
0.00 keys per slot on average.
  • 方式二: 在 Redis 命令行中使用 CLUSTER INFO|SLOTS|NODES 查看节点信息
1
2
3
4
5
6
7
8
9
10
11
12
13
14
15
16
17
18
19
20
21
22
23
24
25
26
27
28
29
30
31
32
33
34
35
36
37
38
39
40
41
42
43
44
45
46
47
48
49
50
51
52
53
54
55
56
57
58
59
60
61
62
63
64
# 查看当前节点信息
127.0.0.1:6380> CLUSTER INFO
cluster_state:ok
cluster_slots_assigned:16384
cluster_slots_ok:16384
cluster_slots_pfail:0
cluster_slots_fail:0
cluster_known_nodes:6
cluster_size:3
cluster_current_epoch:7
cluster_my_epoch:2
cluster_stats_messages_ping_sent:468
cluster_stats_messages_pong_sent:473
cluster_stats_messages_meet_sent:1
cluster_stats_messages_auth-ack_sent:1
cluster_stats_messages_sent:943
cluster_stats_messages_ping_received:473
cluster_stats_messages_pong_received:469
cluster_stats_messages_fail_received:1
cluster_stats_messages_auth-req_received:1
cluster_stats_messages_received:944
total_cluster_links_buffer_limit_exceeded:0

# 查看所有插槽信息
127.0.0.1:6380> CLUSTER SLOTS
1) 1) (integer) 0
2) (integer) 5460
3) 1) "127.0.0.1"
2) (integer) 6382
3) "6c9823906baa11aba873a798cce3a3b3c95465f2"
4) (empty array)
4) 1) "127.0.0.1"
2) (integer) 6379
3) "2b144f1d7bdb31000a519492be980c6634576462"
4) (empty array)
2) 1) (integer) 5461
2) (integer) 10922
3) 1) "127.0.0.1"
2) (integer) 6380
3) "a770892444fbbe4b7d9391b458ac04d6bcba26f0"
4) (empty array)
4) 1) "127.0.0.1"
2) (integer) 6383
3) "4a56b76a379da615b606a499ae475e986eda3efd"
4) (empty array)
3) 1) (integer) 10923
2) (integer) 16383
3) 1) "127.0.0.1"
2) (integer) 6381
3) "76cb8ea9a5d6ba0fa43d31cfa4c33cea8442e07d"
4) (empty array)
4) 1) "127.0.0.1"
2) (integer) 6384
3) "eaf9833aa105e36b22f6330585a972239bab9f50"
4) (empty array)

# 查看所有节点信息
127.0.0.1:6379> CLUSTER NODES
2b144f1d7bdb31000a519492be980c6634576462 127.0.0.1:6379@16379 myself,slave 6c9823906baa11aba873a798cce3a3b3c95465f2 0 1669529164000 7 connected
eaf9833aa105e36b22f6330585a972239bab9f50 127.0.0.1:6384@16384 slave 76cb8ea9a5d6ba0fa43d31cfa4c33cea8442e07d 0 1669529164744 3 connected
a770892444fbbe4b7d9391b458ac04d6bcba26f0 127.0.0.1:6380@16380 master - 0 1669529165776 2 connected 5461-10922
6c9823906baa11aba873a798cce3a3b3c95465f2 127.0.0.1:6382@16382 master - 0 1669529166000 7 connected 0-5460
76cb8ea9a5d6ba0fa43d31cfa4c33cea8442e07d 127.0.0.1:6381@16381 master - 0 1669529166792 3 connected 10923-16383
4a56b76a379da615b606a499ae475e986eda3efd 127.0.0.1:6383@16383 slave a770892444fbbe4b7d9391b458ac04d6bcba26f0 0 1669529165000 2 connected
数据操作

设置键时, 根据键散列后的值所在的插槽位置自动切换到插槽所在的节点上

1
2
3
4
5
6
7
8
9
10
11
12
13
14
15
16
17
18
19
20
21
22
127.0.0.1:6379> KEYS *
(empty array)
127.0.0.1:6379> SET name zhangsan
-> Redirected to slot [5798] located at 127.0.0.1:6380
OK
127.0.0.1:6380> GET name
"zhangsan"

# 集群不支持设置多个键, 需要使用分组的方式
127.0.0.1:6380> MSET age 18 addr beijing
(error) CROSSSLOT Keys in request don't hash to the same slot
127.0.0.1:6380> MSET age{y} 18 addr{y} beijing
OK
127.0.0.1:6380> KEYS *
1) "age{y}"
2) "addr{y}"
3) "name"
127.0.0.1:6379> GET age{y}
-> Redirected to slot [5474] located at 127.0.0.1:6380
"18"
127.0.0.1:6380> GET addr{y}
"beijing"
测试节点

使用 kill 命令停止端口号为 6381 的 redis 进程时, 集群切换 6381 的状态为失联, 同时将从节点 6384 升级为主节点, 等到 6381 恢复后变为 6384 的从节点

1
2
3
4
5
6
7
8
9
10
11
12
13
14
15
16
127.0.0.1:6379> CLUSTER NODES
2b144f1d7bdb31000a519492be980c6634576462 127.0.0.1:6379@16379 myself,slave 6c9823906baa11aba873a798cce3a3b3c95465f2 0 1669529208000 7 connected
eaf9833aa105e36b22f6330585a972239bab9f50 127.0.0.1:6384@16384 slave 76cb8ea9a5d6ba0fa43d31cfa4c33cea8442e07d 0 1669529208000 3 connected
a770892444fbbe4b7d9391b458ac04d6bcba26f0 127.0.0.1:6380@16380 master - 0 1669529207000 2 connected 5461-10922
6c9823906baa11aba873a798cce3a3b3c95465f2 127.0.0.1:6382@16382 master - 0 1669529206000 7 connected 0-5460
76cb8ea9a5d6ba0fa43d31cfa4c33cea8442e07d 127.0.0.1:6381@16381 master - 1669529208334 1669529202178 3 disconnected 10923-16383
4a56b76a379da615b606a499ae475e986eda3efd 127.0.0.1:6383@16383 slave a770892444fbbe4b7d9391b458ac04d6bcba26f0 0 1669529209355 2 connected

# 6381 恢复后变为 6384 的从节点
127.0.0.1:6379> CLUSTER NODES
2b144f1d7bdb31000a519492be980c6634576462 127.0.0.1:6379@16379 myself,slave 6c9823906baa11aba873a798cce3a3b3c95465f2 0 1669529245000 7 connected
eaf9833aa105e36b22f6330585a972239bab9f50 127.0.0.1:6384@16384 master - 0 1669529243086 8 connected 10923-16383
a770892444fbbe4b7d9391b458ac04d6bcba26f0 127.0.0.1:6380@16380 master - 0 1669529244194 2 connected 5461-10922
6c9823906baa11aba873a798cce3a3b3c95465f2 127.0.0.1:6382@16382 master - 0 1669529245227 7 connected 0-5460
76cb8ea9a5d6ba0fa43d31cfa4c33cea8442e07d 127.0.0.1:6381@16381 slave eaf9833aa105e36b22f6330585a972239bab9f50 0 1669529243552 8 connected
4a56b76a379da615b606a499ae475e986eda3efd 127.0.0.1:6383@16383 slave a770892444fbbe4b7d9391b458ac04d6bcba26f0 0 1669529244000 2 connected
查看节点配置文件
1
2
3
4
5
6
7
8
[root@centos7 redis-cluster]# cat nodes-6381.conf
76cb8ea9a5d6ba0fa43d31cfa4c33cea8442e07d 127.0.0.1:6381@16381 myself,slave eaf9833aa105e36b22f6330585a972239bab9f50 0 1669529243521 8 connected
2b144f1d7bdb31000a519492be980c6634576462 127.0.0.1:6379@16379 slave 6c9823906baa11aba873a798cce3a3b3c95465f2 0 1669529243524 7 connected
4a56b76a379da615b606a499ae475e986eda3efd 127.0.0.1:6383@16383 slave a770892444fbbe4b7d9391b458ac04d6bcba26f0 0 1669529243524 2 connected
eaf9833aa105e36b22f6330585a972239bab9f50 127.0.0.1:6384@16384 master - 0 1669529243529 8 connected 10923-16383
6c9823906baa11aba873a798cce3a3b3c95465f2 127.0.0.1:6382@16382 master - 0 1669529243529 7 connected 0-5460
a770892444fbbe4b7d9391b458ac04d6bcba26f0 127.0.0.1:6380@16380 master - 0 1669529243524 2 connected 5461-10922
vars currentEpoch 8 lastVoteEpoch 7
添加新节点

按照 编辑配置文件 创建并修改 cluster6385.conf 文件
启动服务器 redis-server cluster6385.conf, 同时查看服务器是否正常启动

  • 使用命令 redis-cli --cluster add-node --cluster-slave 127.0.0.1:6385 127.0.0.1:6379 将 6385 添加为 6379 的从节点
1
2
3
# 向 6379 节点添加新的从节点
[root@centos7 redis-cluster]# redis-cli --cluster add-node --cluster-slave \
> 127.0.0.1:6385 127.0.0.1:6379
  • 查看节点 6379 的信息, 显示 2 个从节点
1
2
3
4
5
6
7
# 查看节点信息
[root@centos7 redis-cluster]# redis-cli --cluster info 127.0.0.1:6379
127.0.0.1:6379 (8e20e97a...) -> 0 keys | 5461 slots | 2 slaves.
127.0.0.1:6381 (fba8c2ae...) -> 0 keys | 5461 slots | 1 slaves.
127.0.0.1:6380 (57c53adc...) -> 0 keys | 5462 slots | 1 slaves.
[OK] 0 keys in 3 masters.
0.00 keys per slot on average.

集群优点

  • 实现扩容
  • 分担压力
  • 无中心配置相对简单

集群缺点

  • 多建操作不支持, 例如 MSET 命令设置多个键不支持, 需要使用分组方式 MSET name{user} zhangsan age{user} 20 addr{user} beijing
  • 多键的 Redis 事务不支持
  • Lua 脚本不支持
  • 迁移方案需要整体迁移而不是逐步过渡, 复杂度较大

缓存穿透、击穿、雪崩

缓存穿透

缓存穿透是指缓存和数据库中都没有的数据, 在高并发下对不存在的 key 的操作. 由于缓存是不命中时被动写的, 并且出于容错考虑, 如果存储层查不到数据则不写入缓存, 这将导致这个不存在的数据每次请求都要到存储层去查询, 失去的缓存的意义. 在流量大时, 可能引起数据库崩溃. 或者有人利用不存在的 key 频繁攻击应用, 可能会引起应用的崩溃

解决办法
  • 接口层增加校验, 如用户鉴权校验、id 做基础校验、 id <= 0 的直接拦截
  • 从缓存取不到的数据, 在数据库中也取不到时,可以将 key-value 写为 key-null, 缓存有效时间设置短点, 这样可以防止攻击用户反复用同一个 key 暴力攻击
  • 布隆过滤器, 类似于一个 hash set, 用于快速判断某个元素是否存在于集合中, 其典型的应用场景就是快速判断一个 key 是否存在于某容器, 不存在就直接返回. 布隆过滤器的关键就在于 hash 算法和容器大小

缓存击穿

缓存击穿是指缓存中没有但数据库中有的数据(一般是缓存时间到期), 在高并发下对同一 key 的操作. 如果在缓存中没有获取到数据, 又同时在数据库中获取到数据, 引起数据库压力过大.

解决办法
  • 设置热点数据永不过期
  • 接口限流与熔断、降级, 重要的接口一定要做好限流策略, 防止用户恶意刷接口, 同时要降级准备, 当接口中的某些服务不可用时, 进行熔断, 失败快速返回机制
  • 加互斥锁

缓存雪崩

缓存雪崩是指缓存中数据大批量到过期时间, 而查询数据量巨大, 引起数据库压力过大甚至崩溃. 和缓存击穿不同的是, 缓存击穿指并发查询同一条数据, 缓存雪崩是不同数据都过期了, 很多数据都查不到从而查询数据库

解决办法
  • 缓存数据的过期时间设置随机, 防止同一时间大量数据过期现象发生
  • 如果缓存数据库是分布式部署, 将热点数据均匀分布在不同的缓存数据库中
  • 设置热点数据永不过期

慢查询

Redis 慢查询和 Redis 定义慢查询的 阈值 有关

slowlog-log-slower-than 10000 单位微秒, 当 Redis 命令的执行时间超过该值时, Redis 将其记录在 Redis 的慢查询日志中
slowlog-max-len 128 记录的条数超过时会只存储最新的 slowlog-max-len 条

使用复杂度过高的命令

复杂的命令一般指 O(N)以上的命令, 如 sort、sunion、zunionstore 聚合类的命令, 或是 O(N)类的命令, 对于 O(N)以上的命令, Redis 在操作内存数据时耗时过高, 会耗费更多的 CPU 资源, 导致查询变慢
Redis 是单线程处理客户端请求的, 如果遇到处理上面的请求时, 就会导致后面的请求发生排队, 对于客户端来说响应时间就会变长

解决问题的原则

  • 尽量不使用 O(N)以上的命令, 某些数据需要排序或者聚合操作时, 可以放在客户端处理
  • 执行 O(N)命令时, 保证 N 尽量的小(推荐 N <= 300), 每次获取尽量少的数据, 让 Redis 可以及时处理返回

大 Key 问题

通常是 key 对应的 value 值过大, 此类问题在 SET/DEL 这类命令中也会出现慢查询
SET/DEL 的过程

  • 写入数据: 为该数据分配内存空间
  • 删除数据: 释放该数据对应的内存空间

当数据值较大时, Redis 分配数据内存和释放内存空间都比较耗时

解决问题的原则

  • 尽量避免写入大 Key(不要写入无关的数据, 数据实在过大进行拆分, 通过多 key 存储)
  • 如果 Redis 是 4.0 以上版本, 尽量使用 UNLINK代替 DEL命令, 此命令将删除 key 和内存回收放到其他线程执行, 从而降低对 Redis 的影响
  • 如果 Redis 是 6.0 以上版本, 可以开启 lazy-free, 在执行 DEL 命令时、释放内存也会放到其他线程中执行

lazyfree-lazy-user-del no 修改 DEL 默认命令的行为使其更接近于 UNLINK命令, 默认不开启

集中过期

Redis 过期策略

  • 被动过期: 只有当访问某个 key 时, 才会检测该 key 是否已经过期, 如果已经过期则从实例删除该 key
  • 主动过期: Redis 内部存在一个定时任务, 默认每间隔 100 毫秒就会从全局的过期哈希表中随机取出 20 个 key, 然后删除其中过期的 key, 如果过期 key 的比例超过了 25%, 则继续重复此过程, 直到过期 key 的比例下降到 25% 以下, 或者这次任务的执行耗时超过了 25 毫秒, 才会退出循环

主动过期 key 的定时任务是在 Redis 主线程中执行的, 如果在执行主动过期的过程中, 出现了集中过期, 就需要大量删除过期 key, 如果此时应用程序在访问 Redis 时, 必须等待这个过期任务执行结束, 此时 Redis 就有可能产生慢查询

解决问题的原则

  • 避免集中过期, 比如将过期时间随机化, 添加一个随机的值, 分散集中过期 key 的过期时间, 降低 Redis 清理过期 key 的压力
  • 如果 Redis 是 4.0 以上版本, 可以开启 lazy-free, 当删除过期 key 时, 把释放内存的操作放到其他线程中执行, 避免阻塞主线程