主从复制 将一台 Redis 服务器的数据,复制到其他的 Redis 服务器. 前者称为主节点(Master/Leader),后者称为从节点(Slave/Follower), 数据的复制是单向的!只能由主节点复制到从节点(主节点以写为主、从节点以读为主)—— 读写分离.
1
2
3
4
5
6
7
8
9
10
11
12
13
127.0.0.1:6379> INFO replication role:master connected_slaves:0 master_failover_state:no-failover master_replid:e49c9c650c72cd6e3f369365808da6de6efd3825 master_replid2:0000000000000000000000000000000000000000 master_repl_offset:0 second_repl_offset:-1 repl_backlog_active:0 repl_backlog_size:1048576 repl_backlog_first_byte_offset:0 repl_backlog_histlen:0
作用
数据冗余: 主从复制实现了数据的热备份, 是持久化之外的一种数据冗余的方式
故障恢复: 当主节点故障时, 从节点可以暂时替代主节点提供服务, 是一种服务冗余的方式
负载均衡: 在主从复制的基础上, 配合读写分离, 由主节点进行写操作, 从节点进行读操作, 分担节点的负载; 尤其是在多读少写的场景下, 通过多个从节点分担负载, 提高并发量
高可用(集群)基石: 主从复制还是哨兵和集群能够实施的基础
复制原理
Redis 2.8 以上使用 PSYNC 命令完成同步
从节点向主节点发送 PSYNC 命令, 如果从节点是首次连接主节点时会触发一次全量复制
接到 PSYNC 命令的主节点会调用 BGSAVE 命令 fork 一个新线程创建 RDB 文件, 并使用缓冲区记录接下来执行的所有写命令
当 RDB 文件生成完毕后, 主节点向所有从节点发送 RDB 文件, 并在发送期间继续记录被执行的写命令
从节点接收到 RDB 文件后丢弃所有旧数据并载入这个文件
主节点将缓冲区记录的所有写命令发送给从节点执行
如果从节点断开连接后重连, 主节点仅将部分缺失的数据同步给从节点
全量复制: 从节点接收到数据库文件后, 将其全部加载到内存中
增量复制: 主节点将新的所有收集到的修改命令依次传给从节点, 完成同步
命令模式 ===每台 Redis 服务器都是主节点===, 只用配置从服务器即可
运行时有效 , 只在本次服务器运行时有效, 重启服务器后将会丢失配置信息
1 2 3 4 5 6 7 8 9 10 11 12 13 14 15 16 17 18 19 20 21 127.0.0.1:6380> REPLICAOF 127.0.0.1 6379 OK 127.0.0.1:6381> REPLICAOF 127.0.0.1 6379 OK 127.0.0.1:6379> INFO replication role:master connected_slaves:2 slave0:ip=127.0.0.1,port=6380,state=online,offset=153689,lag=0 slave1:ip=127.0.0.1,port=6381,state=online,offset=153557,lag=0 master_failover_state:no-failover master_replid:749aaed3f58b97f7c01d3732a6f6c55be205c4b2 master_replid2:451a270c3954af29f43878dd9bfeac579d011972 master_repl_offset:153689 second_repl_offset:133525 repl_backlog_active:1 repl_backlog_size:1048576 repl_backlog_first_byte_offset:133525 repl_backlog_histlen:20165
1 2 3 4 5 6 7 8 9 10 11 12 13 127.0.0.1:6379> SET name helloworld OK 127.0.0.1:6380> GET name "helloworld" 127.0.0.1:6380> SET age 18 (error) READONLY You can\'t write against a read only replica. 127.0.0.1:6381> GET name "helloworld" 127.0.0.1:6381> SET age 18 (error) READONLY You can\'t write against a read only replica.
提升从服务器角色
REPLICAOF NO ONE 将从服务器更改为主服务器
配置文件模式 永久有效 , 但是缺少可扩展性, 每次修改主从节点配置都需要重启 Redis 服务
redis.conf 基础配置,集群配置
1 2 3 4 5 6 7 8 9 10 11 12 13 14 15 16 17 18 19 20 21 22 23 24 25 26 27 28 29 30 31 32 33 34 35 36 37 38 39 40 41 42 43 44 45 46 47 48 49 50 51 52 53 54 55 56 57 58 59 60 61 62 63 64 65 66 67 68 69 70 71 72 73 74 75 76 77 78 79 80 81 82 83 84 85 86 87 88 89 90 91 92 93 94 95 96 97 98 99 100 101 102 103 104 105 106 107 108 109 110 111 112 113 114 115 116 117 118 119 120 121 122 123 include /root/redis-cluster/redis.conf bind 127.0 .0 .1 protected-mode no port 6379 daemonize yes pidfile /var/run/redis_6379.pid loglevel notice logfile "" dbfilename dump.rdb dir "" appendonly no appendfilename "appendonly.aof" appenddirname "appendonlydir" replicaof <masterip> <masterport> masteruser <username>
1 2 3 4 5 6 7 8 9 10 11 12 13 14 15 16 17 18 19 20 [root@centos7 workspace]# redis-cli 127.0.0.1:6379> KEYS * (error) NOAUTH Authentication required. 127.0.0.1:6379> ACL WHOAMI (error) NOAUTH Authentication required. 127.0.0.1:6379> AUTH 1006611 OK 127.0.0.1:6379> ACL WHOAMI "default" [root@centos7 workspace]# redis-cli --user default --pass 1006611 Warning: Using a password with '-a' or '-u' option on the command line interface may not be safe. 127.0.0.1:6379> ACL WHOAMI "default" 127.0.0.1:6379> KEYS * 1) "hash:zhang" 2) "age" 3) "name"
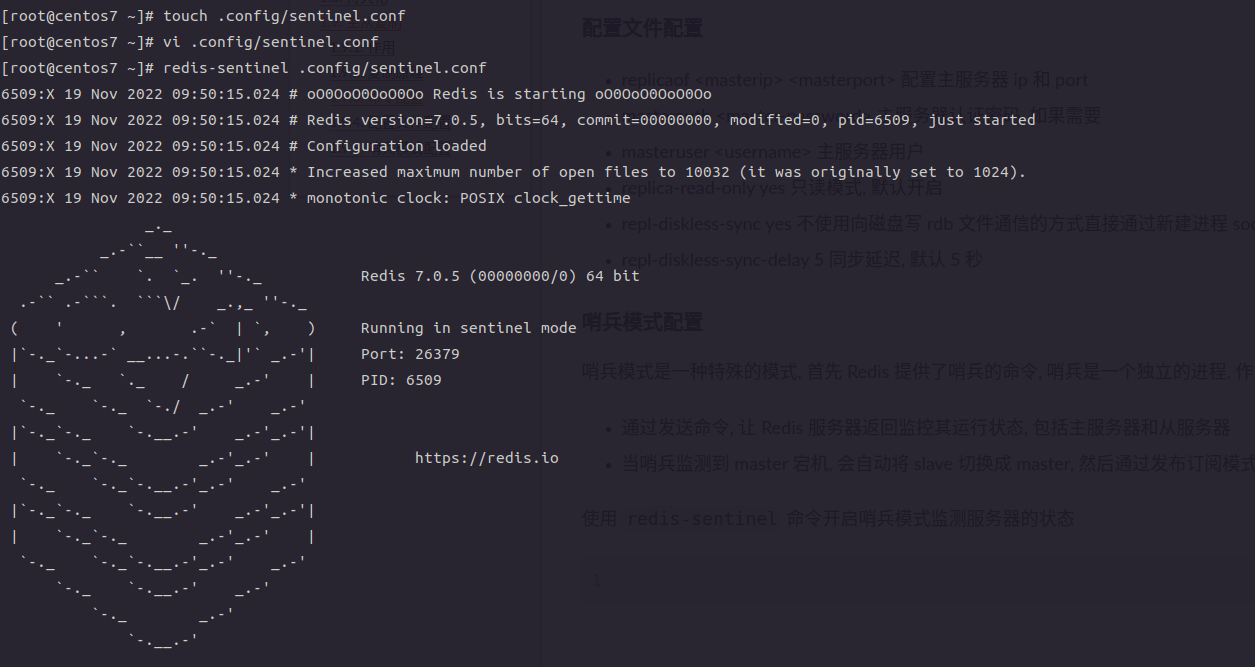
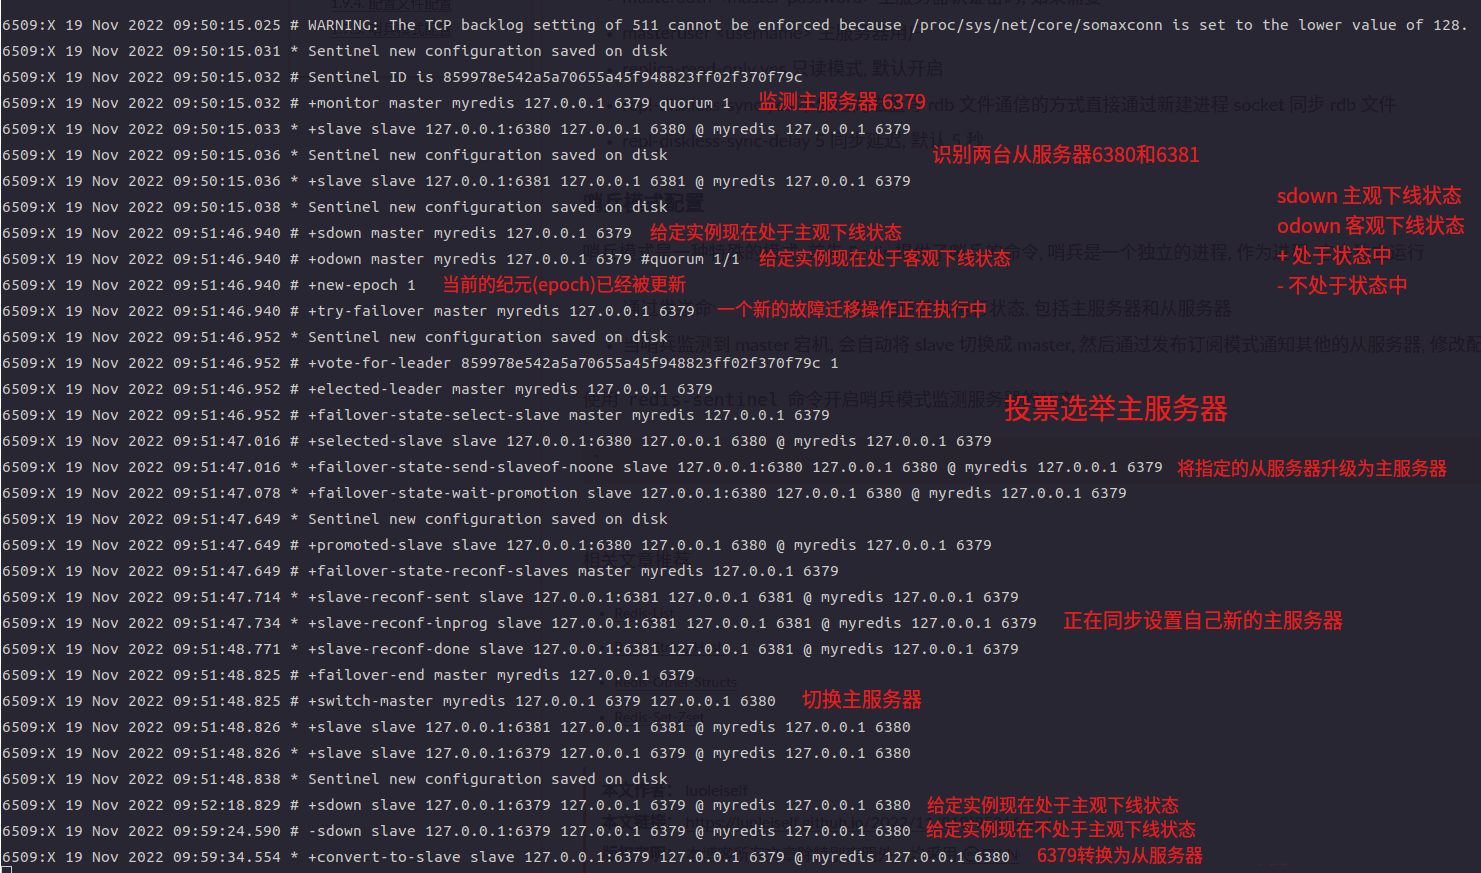
哨兵模式 哨兵模式是一种特殊的模式, Redis 提供了启动哨兵的工具命令, 哨兵是一个独立的进程运行
哨兵节点通过发送 PING 命令, 监控所有的主(从)节点的反馈运行状态
当哨兵节点监控到 master 掉线并且其它多个哨兵节点确认 master 掉线后, 开始选取 leader 启动故障转移操作执行切换 master, 然后通过发布订阅模式通知其他的从节点, 修改配置文件并关联新的主节点
当 master 重连之后, 哨兵节点自动将 master 节点修改为 slave 模式
不能水平扩容, 不能动态的增、删节点
高可用特性会受到主节点的内存的限制
执行任务
监控: 定期检查主节点和从节点的健康状态, 包括发送 PING 命令、检查返回结果和检测通信故障
自动故障转移: 当一个主节点不能正常工作时, Sentinel 会开始一次自动故障迁移操作, 它会将失效主节点的其中一个从节点升级为新的主节点, 并让失败的主节点的其他从节点改为复制新的主节点. 当客户端试图连接失效的主节点时, 集群也会向客户端返回新的主节点的地址, 使得集群可以使用新主节点代替失效节点
高可用性切换: 选举新的主节点后, 哨兵节点会自动将从节点切换为新的主节点, 并通知其它从节点更新复制目标
配置提供者: 当客户端连接到哨兵节点时, 哨兵节点可以根据 Redis 集群的配置信息, 将其重定向到正确的主节点
选举算法 首先, 领头 sentinel 根据从节点的信号反馈将从节点列表中失联的节点剔除, 按照从节点的优先级(replica-priority)进行排序并选择优先级最高的从节点, 如果有多个具有相同最高优先级的从节点, 那么, 领头 sentinel 将多个具有相同最高优先级的从节点按照复制偏移量(复制积压缓冲区中存储的写操作的字节占用累加, 主从节点进行 PSYNC 使用)进行排序并选择其中偏移量最大(偏移量最大保存的数据最新)的从节点, 如果有多个优先级最高, 复制偏移量最大的从节点, 那么 领头 sentinel 将按照从节点的运行 ID 进行排序并选择其中 ID 最小的从节点
replica-priority > replica-offset > run-ID
配置方式
sentinel.conf 配置文件
1
2
3
4
5
6
7
8
9
10
11
12
13
14
15
16
17
18
19
20
21
22
23
24
25
26
27
28
29
30
31
32
33
34
35
36
37
38
39
40
41
42
43
44
45
46
47
48
49
50
port 26379 protected-mode no daemonize no pidfile /var/run/redis-sentinel-26379.pid loglevel notice logfile "" dir /tmp sentinel monitor mymaster 127.0 .0 .1 6379 2 sentinel down-after-milliseconds mymaster 30000 acllog-max-len 128 sentinel parallel-syncs mymaster 1 sentinel failover-timeout mymaster 180000 sentinel deny-scripts-reconfig yes
API INFO 命令作用同在 数据节点 上操作
INFO sentinel 查看 sentinel 节点信息
1
2
3
4
5
6
7
8
9
10
11
luolei@KLVC-WXX9:~$ redis-cli -h 127.0.0.1 -p 26379 127.0.0.1:26379> INFO sentinel sentinel_masters:1 sentinel_tilt:1 sentinel_tilt_since_seconds:17 sentinel_total_tilt:24 sentinel_running_scripts:0 sentinel_scripts_queue_length:0 sentinel_simulate_failure_flags:0 master0:name=mymaster,status=ok,address=127.0.0.1:6379,slaves=2,sentinels=3
SENTINEL
HELP 帮助命令
CKQUORUM 检查当前哨兵配置的权重是否满足进行故障转移操作的投票数
CONFIG SET param value [param value …] 设置全局哨兵的配置参数
CONFIG GET param [param param …] 获取全局哨兵的配置
1
2
127.0.0.1:26380> SENTINEL CKQUORUM mymaster OK 3 usable Sentinels. Quorum and failover authorization can be reached
FLUSHCONFIG 重写配置信息到磁盘上, 可以用来将配置项保存到其他磁盘上
INFO-CACHE <master-name> 返回主节点的所有副本的缓存信息
SIMULATE-FAILURE [CRASH-AFTER-ELECTION] [CRASH-AFTER-PROMOTION] [HELP] 模拟一次哨兵节点崩溃故障
GET-MASTER-ADDR-BY-NAME <master-name> 根据主节点名称获取 ip 和端口号
FAILOVER <master-name> 直接执行故障转移操作不询问其他哨兵节点
IS-MASTER-DOWN-BY-ADDR <ip> <port> <current-epoch> <runid> 当前哨兵节点询问其他哨兵节点指定节点是否客观下线
1
2
3
4
5
6
7
8
9
10
11
12
13
14
15
16
17
18
19
20
21
127.0.0.1:26380> SENTINEL GET-MASTER-ADDR-BY-NAME mymaster 1) "127.0.0.1" 2) "6379" 127.0.0.1:26379> SENTINEL FAILOVER mymaster OK 127.0.0.1:26379> INFO sentinel sentinel_masters:1 sentinel_tilt:1 sentinel_tilt_since_seconds:25 sentinel_total_tilt:83 sentinel_running_scripts:0 sentinel_scripts_queue_length:0 sentinel_simulate_failure_flags:0 master0:name=mymaster,status=ok,address=127.0.0.1:6381,slaves=2,sentinels=3 127.0.0.1:26380> SENTINEL GET-MASTER-ADDR-BY-NAME mymaster 1) "127.0.0.1" 2) "6381"
MYID 获取当前哨兵节点的 ID
PENDING-SCRIPTS 获取挂起的脚本信息
1
2
3
4
5
127.0.0.1:26381> SENTINEL MYID "0da9806af77e04836bc484e04235a86567cb9d2a" 127.0.0.1:26381> SENTINEL PENDING-SCRIPTS (empty array)
MASTERS 显示所有监控的主节点的状态信息
MASTER <master-name> 显示指定主节点的状态信息
1
2
3
4
5
6
7
8
9
10
11
12
13
14
15
16
17
18
19
20
21
22
23
24
25
26
27
28
29
30
31
32
33
34
35
36
37
38
39
40
41
42
43
44
45
46
47
48
49
50
51
52
53
54
55
56
57
58
59
60
61
62
63
64
65
66
67
68
69
70
71
72
73
74
75
76
77
78
79
80
81
82
83
127.0.0.1:26381> SENTINEL MASTERS 1) 1) "name" 2) "mymaster" 3) "ip" 4) "127.0.0.1" 5) "port" 6) "6381" 7) "runid" 8) "1cb144641741bbf5fdfb3cb9899a3d88cefaa98d" 9) "flags" 10) "master" 11) "link-pending-commands" 12) "0" 13) "link-refcount" 14) "1" 15) "last-ping-sent" 16) "0" 17) "last-ok-ping-reply" 18) "480" 19) "last-ping-reply" 20) "480" 21) "down-after-milliseconds" 22) "30000" 23) "info-refresh" 24) "6960" 25) "role-reported" 26) "master" 27) "role-reported-time" 28) "1710683" 29) "config-epoch" 30) "1" 31) "num-slaves" 32) "2" 33) "num-other-sentinels" 34) "2" 35) "quorum" 36) "2" 37) "failover-timeout" 38) "180000" 39) "parallel-syncs" 40) "2" 127.0.0.1:26381> SENTINEL MASTER mymaster 1) "name" 2) "mymaster" 3) "ip" 4) "127.0.0.1" 5) "port" 6) "6381" 7) "runid" 8) "1cb144641741bbf5fdfb3cb9899a3d88cefaa98d" 9) "flags" 10) "master" 11) "link-pending-commands" 12) "0" 13) "link-refcount" 14) "1" 15) "last-ping-sent" 16) "0" 17) "last-ok-ping-reply" 18) "922" 19) "last-ping-reply" 20) "922" 21) "down-after-milliseconds" 22) "30000" 23) "info-refresh" 24) "4976" 25) "role-reported" 26) "master" 27) "role-reported-time" 28) "1578143" 29) "config-epoch" 30) "1" 31) "num-slaves" 32) "2" 33) "num-other-sentinels" 34) "2" 35) "quorum" 36) "2" 37) "failover-timeout" 38) "180000" 39) "parallel-syncs" 40) "2"
REPLICAS <master-name> 获取指定主节点的所有副本状态信息
1
2
3
4
5
6
7
8
9
10
11
12
13
14
15
16
17
18
19
20
21
22
23
24
25
26
27
28
29
30
31
32
33
34
35
36
37
38
39
40
41
42
43
44
45
46
47
48
49
50
51
52
53
54
55
56
57
58
59
60
61
62
63
64
65
66
67
68
69
70
71
72
73
74
75
76
77
78
79
80
81
82
83
84
85
127.0.0.1:26381> SENTINEL REPLICAS mymaster 1) 1) "name" 2) "127.0.0.1:6380" 3) "ip" 4) "127.0.0.1" 5) "port" 6) "6380" 7) "runid" 8) "21bf545d749eb9e3bebb635b2ff4a324a45111cc" 9) "flags" 10) "slave" 11) "link-pending-commands" 12) "0" 13) "link-refcount" 14) "1" 15) "last-ping-sent" 16) "0" 17) "last-ok-ping-reply" 18) "720" 19) "last-ping-reply" 20) "720" 21) "down-after-milliseconds" 22) "30000" 23) "info-refresh" 24) "9414" 25) "role-reported" 26) "slave" 27) "role-reported-time" 28) "2460026" 29) "master-link-down-time" 30) "0" 31) "master-link-status" 32) "ok" 33) "master-host" 34) "127.0.0.1" 35) "master-port" 36) "6381" 37) "slave-priority" 38) "100" 39) "slave-repl-offset" 40) "1002916" 41) "replica-announced" 42) "1" 2) 1) "name" 2) "127.0.0.1:6379" 3) "ip" 4) "127.0.0.1" 5) "port" 6) "6379" 7) "runid" 8) "acaa1a5530f6fe99b4c2b801bdcdeaa892adac84" 9) "flags" 10) "slave" 11) "link-pending-commands" 12) "0" 13) "link-refcount" 14) "1" 15) "last-ping-sent" 16) "0" 17) "last-ok-ping-reply" 18) "720" 19) "last-ping-reply" 20) "720" 21) "down-after-milliseconds" 22) "30000" 23) "info-refresh" 24) "9414" 25) "role-reported" 26) "slave" 27) "role-reported-time" 28) "2419748" 29) "master-link-down-time" 30) "0" 31) "master-link-status" 32) "ok" 33) "master-host" 34) "127.0.0.1" 35) "master-port" 36) "6381" 37) "slave-priority" 38) "100" 39) "slave-repl-offset" 40) "1002916" 41) "replica-announced" 42) "1"
SENTINELS <master-name> 获取指定主节点的除当前哨兵节点以外的其他哨兵节点的状态信息
1
2
3
4
5
6
7
8
9
10
11
12
13
14
15
16
17
18
19
20
21
22
23
24
25
26
27
28
29
30
31
32
33
34
35
36
37
38
39
40
41
42
43
44
45
46
47
48
49
50
51
52
53
54
55
56
57
127.0.0.1:26381> SENTINEL SENTINELS mymaster 1) 1) "name" 2) "228e225887fc9c4d3a2b27f2757b250e895f143b" 3) "ip" 4) "127.0.0.1" 5) "port" 6) "26379" 7) "runid" 8) "228e225887fc9c4d3a2b27f2757b250e895f143b" 9) "flags" 10) "sentinel" 11) "link-pending-commands" 12) "0" 13) "link-refcount" 14) "1" 15) "last-ping-sent" 16) "0" 17) "last-ok-ping-reply" 18) "610" 19) "last-ping-reply" 20) "610" 21) "down-after-milliseconds" 22) "30000" 23) "last-hello-message" 24) "143" 25) "voted-leader" 26) "?" 27) "voted-leader-epoch" 28) "0" 2) 1) "name" 2) "ab9327497b410c1cc89772e17e2548ac1f0e0b8e" 3) "ip" 4) "127.0.0.1" 5) "port" 6) "26380" 7) "runid" 8) "ab9327497b410c1cc89772e17e2548ac1f0e0b8e" 9) "flags" 10) "sentinel" 11) "link-pending-commands" 12) "0" 13) "link-refcount" 14) "1" 15) "last-ping-sent" 16) "0" 17) "last-ok-ping-reply" 18) "610" 19) "last-ping-reply" 20) "610" 21) "down-after-milliseconds" 22) "30000" 23) "last-hello-message" 24) "1357" 25) "voted-leader" 26) "?" 27) "voted-leader-epoch" 28) "0"
REMOVE <master-name> 移除监控主节点
MONITOR <name> <ip> <port> <quorum> 开启监控主节点, 配置项将会被重置
1
2
3
4
5
6
7
8
9
10
11
12
13
14
15
16
17
18
19
20
21
22
23
24
25
26
27
28
29
30
31
32
33
34
35
36
37
38
39
40
41
42
43
44
45
46
47
48
127.0.0.1:26381> SENTINEL REMOVE mymaster OK 127.0.0.1:26381> SENTINEL MASTERS (empty array) 127.0.0.1:26381> SENTINEL MONITOR mymaster 127.0.0.1 6381 2 OK 127.0.0.1:26381> SENTINEL masters 1) 1) "name" 2) "mymaster" 3) "ip" 4) "127.0.0.1" 5) "port" 6) "6381" 7) "runid" 8) "1cb144641741bbf5fdfb3cb9899a3d88cefaa98d" 9) "flags" 10) "master" 11) "link-pending-commands" 12) "0" 13) "link-refcount" 14) "1" 15) "last-ping-sent" 16) "0" 17) "last-ok-ping-reply" 18) "-1309" 19) "last-ping-reply" 20) "-1309" 21) "down-after-milliseconds" 22) "30000" 23) "info-refresh" 24) "2947" 25) "role-reported" 26) "master" 27) "role-reported-time" 28) "2980" 29) "config-epoch" 30) "1" 31) "num-slaves" 32) "2" 33) "num-other-sentinels" 34) "2" 35) "quorum" 36) "2" 37) "failover-timeout" 38) "180000" 39) "parallel-syncs" 40) "1"
SET <master-name> <option> <value> [<option> <value> …] 设置当前哨兵节点对指定主节点的配置项, 执行成功会立即更新当前哨兵节点的配置文件
1
2
3
4
5
6
7
8
9
10
11
12
13
14
15
16
17
18
19
20
21
22
23
24
25
26
27
28
29
30
31
32
33
34
35
36
37
38
39
40
41
42
43
44
45
46
47
48
49
50
51
52
53
54
55
56
57
58
59
60
61
62
63
64
65
66
67
68
69
70
71
127.0.0.1:26380> SENTINEL SET mymaster down-after-milliseconds 10000 OK luolei@KLVC-WXX9:~$ cat sentinel-26380.conf protected-mode no port 26380 daemonize yes pidfile "/var/run/redis-sentinel-26380.pid" loglevel notice logfile "sentinel-26380.log" dir "/var/redis" sentinel monitor mymaster 127.0.0.1 6381 2 acllog-max-len 128 sentinel deny-scripts-reconfig yes sentinel resolve-hostnames no sentinel announce-hostnames no latency-tracking-info-percentiles 50 99 99.9 user default on nopass sanitize-payload ~* &* +@all sentinel myid ab9327497b410c1cc89772e17e2548ac1f0e0b8e sentinel config-epoch mymaster 1 sentinel leader-epoch mymaster 0 sentinel current-epoch 1 sentinel known-replica mymaster 127.0.0.1 6379 sentinel known-replica mymaster 127.0.0.1 6380 sentinel known-sentinel mymaster 127.0.0.1 26381 0da9806af77e04836bc484e04235a86567cb9d2a sentinel known-sentinel mymaster 127.0.0.1 26379 228e225887fc9c4d3a2b27f2757b250e895f143b sentinel down-after-milliseconds mymaster 10000 127.0.0.1:26381> SENTINEL SET mymaster parallel-syncs 2 OK luolei@KLVC-WXX9:~$ cat sentinel-26381.conf protected-mode no port 26381 daemonize yes pidfile "/var/run/redis-sentinel-26381.pid" loglevel notice logfile "sentinel-26381.log" dir "/var/redis" sentinel monitor mymaster 127.0.0.1 6381 2 acllog-max-len 128 sentinel deny-scripts-reconfig yes sentinel resolve-hostnames no sentinel announce-hostnames no latency-tracking-info-percentiles 50 99 99.9 user default on nopass sanitize-payload ~* &* +@all sentinel myid 0da9806af77e04836bc484e04235a86567cb9d2a sentinel config-epoch mymaster 1 sentinel leader-epoch mymaster 0 sentinel current-epoch 1 sentinel known-replica mymaster 127.0.0.1 6380 sentinel known-replica mymaster 127.0.0.1 6379 sentinel known-sentinel mymaster 127.0.0.1 26379 228e225887fc9c4d3a2b27f2757b250e895f143b sentinel known-sentinel mymaster 127.0.0.1 26380 ab9327497b410c1cc89772e17e2548ac1f0e0b8e sentinel parallel-syncs mymaster 2
CLIENT 管理客户端连接
GETNAME 获取当前连接的名称
SETNAME <name> 设置当前连接的名称
SETINFO <option> <value> 设置当前客户端的元属性
ID 获取当前连接的 id
INFO 获取当前连接的状态信息
1
2
3
4
5
6
7
8
127.0.0.1:26381> CLIENT ID (integer ) 8 127.0.0.1:26381> CLIENT SETNAME test OK 127.0.0.1:26381> CLIENT GETNAME "test" 127.0.0.1:26381> CLIENT INFO id =8 addr=127.0.0.1:57060 laddr=127.0.0.1:26381 fd=23 name=test age=686 idle=0 flags=N db=0 sub=0 psub=0 ssub=0 multi=-1 watch=0 qbuf=26 qbuf-free=20448 argv-mem=10 multi-mem=0 rbs=1024 rbp=0 obl=0 oll=0 omem=0 tot-mem=22554 events=r cmd=client|info user=default redir=-1 resp=2 lib-name= lib-ver= io-thread=0 tot-net-in=951 tot-net-out=39039 tot-cmds=23
LIST 获取所有客户端连接的信息
TYPE (NORMAL|MASTER|REPLICA|PUBSUB)
1
2
3
4
127.0.0.1:26381> CLIENT LIST id =3 addr=127.0.0.1:48136 laddr=127.0.0.1:26381 fd=20 name=sentinel-ab932749-cmd age=2099 idle=0 flags=N db=0 sub=0 psub=0 ssub=0 multi=-1 watch=0 qbuf=0 qbuf-free=0 argv-mem=0 multi-mem=0 rbs=1024 rbp=7 obl=0 oll=0 omem=0 tot-mem=2048 events=r cmd=ping user=default redir=-1 resp=2 lib-name= lib-ver= io-thread=0 tot-net-in=165341 tot-net-out=18272 tot-cmds=3052id =4 addr=127.0.0.1:48140 laddr=127.0.0.1:26381 fd=21 name=sentinel-228e2258-cmd age=2099 idle=0 flags=N db=0 sub=0 psub=0 ssub=0 multi=-1 watch=0 qbuf=0 qbuf-free=0 argv-mem=0 multi-mem=0 rbs=1024 rbp=7 obl=0 oll=0 omem=0 tot-mem=2048 events=r cmd=publish user=default redir=-1 resp=2 lib-name= lib-ver= io-thread=0 tot-net-in=165327 tot-net-out=18265 tot-cmds=3051id =8 addr=127.0.0.1:57060 laddr=127.0.0.1:26381 fd=23 name=test age=612 idle=0 flags=N db=0 sub=0 psub=0 ssub=0 multi=-1 watch=0 qbuf=26 qbuf-free=20448 argv-mem=10 multi-mem=0 rbs=1024 rbp=10 obl=0 oll=0 omem=0 tot-mem=22554 events=r cmd=client|list user=default redir=-1 resp=2 lib-name= lib-ver= io-thread=0 tot-net-in=925 tot-net-out=37943 tot-cmds=22
KILL 关闭指定客户端连接
ADDR ip:port 关闭指定 IP 地址的客户端连接
ID client-id 关闭指定 ID(CLIENT LIST) 的客户端连接
TYPE type 关闭所有指定类型的客户端, normal, master, slave, replica, pubsub
USER username 关闭所有使用用户名认证的客户端连接
MAXAGE maxage 关闭所有超过指定使用时间(秒)的客户端连接
1
2
127.0.0.1:26381> CLIENT KILL 127.0.0.1:50656 OK
PAUSE timeout [WRITE | ALL] 挂起所有或写操作的客户端连接指定的时间(毫秒)
UNPAUSE 恢复挂起的客户端连接
一主三从哨兵配置
1 2 3 4 5 6 7 8 9 10 11 12 13 14 15 16 17 18 19 20 21 22 23 port 26379 daemonize yes pidfile /var/run/redis-sentinel-26379.pid logfile "redis_26379.log" dir /tmp sentinel monitor myredis 127.0 .0 .1 6379 2 port 36379 daemonize yes pidfile /var/run/redis-sentinel-36379.pid logfile "redis_36379.log" dir /tmp sentinel monitor myredis 127.0 .0 .1 6379 2 port 46379 daemonize yes pidfile /var/run/redis-sentinel-46379.pid logfile "redis_46379.log" dir /tmp sentinel monitor myredis 127.0 .0 .1 6379 2
1 2 3 4 5 6 7 8 9 10 11 12 13 14 15 16 17 18 19 20 21 22 23 24 25 26 27 28 29 30 31 32 33 bind 127.0 .0 .1 port 6379 protected-mode no daemonize yes pidfile /var/run/redis_6379.pid logfile "redis_6379.log" dir /tmp dbfilename dump6379.rdb bind 127.0 .0 .1 port 6380 protected-mode no daemonize yes pidfile /var/run/redis_6380.pid logfile "redis_6380.log" dir /tmp dbfilename dump6380.rdb replicaof 127.0 .0 .1 6379 bind 127.0 .0 .1 port 6381 protected-mode no daemonize yes pidfile /var/run/redis_6381.pid logfile "redis_6381.log" dir /tmp dbfilename dump6381.rdb replicaof 127.0 .0 .1 6379
1
2
3
4
5
6
[root@centos7 ~]# redis-server .config/redis_6379.conf [root@centos7 ~]# redis-server .config/redis_6380.conf [root@centos7 ~]# redis-server .config/redis_6381.conf [root@centos7 ~]# redis-sentinel .config/sentinel_26379.conf [root@centos7 ~]# redis-sentinel .config/sentinel_36379.conf [root@centos7 ~]# redis-sentinel .config/sentinel_46379.conf
集群模式
Redis 3.0 支持
Redis Cluster 是一种服务器 Sharding(分片) 技术, Sharding 采用 slot 的概念, 一共分成 16384 个 slot, 对于每个进入 Redis 的键值对, 对 key 执行 CRC16(key) mod 16384 操作, 得到的结果就是对应的 slot.
Redis 集群中的每个 node 负责分摊这 16384 个 slot 中的一部分, 当动态增减 node 时, 需要将 16384 个 slot 再分配, slot 中的键值对也要迁移, 这一过程目前还处于半自动状态仍需要人工介入, 如果某个 node 发生故障, 则此 node 负责的 slot 也就失效, 整个集群将不能工作
官方推荐的方案是将 node 配置成主从结构, 即 1:n, 如果主节点失效, Redis Cluster 根据选举算法从 slave 节点中选择一个升级为主节点继续提供服务, 如果失效的主节点恢复正常后则作为新的主节点的从节点
Cluster Slot
从心跳包的大小、网络带宽、心跳并发、压缩率鞥维度考虑, 16384 个插槽更具有优势且能满足业务需求
正常的心跳数据包携带节点的完整配置, 它能以幂等方式来更新配置. 如果采用 16384 个插槽, 占空间 2KB(16384/8); 如果采用 65536 个插槽,占空间 8KB(65536/8). 8KB 的心跳包看似不大, 比起 16384 个插槽, 头大小增加了 4 倍,ping 消息的消息头太大, 浪费带宽
Redis Cluster 不太可能扩展到超过 1000 个主节点, 太多可能导致网络拥堵
16384 个插槽比较合适, 当集群扩展到 1000 个节点时, 也能确保每个主节点有足够的插槽
集群特点
数据自动分片: 集群自动将数据分布到不同的节点上, 实现数据的均衡存储和负载均衡
自动故障转移: 当主节点发生故障时, 集群会自动进行故障检测, 并将从节点升级为新的主节点, 以保证系统的可用性
内部通信协议: 集集群使用 Gossip 协议进行节点之间的通信和状态更新, 确保集群的一致性和高效性
客户端路由: 客户端可以通过集群提供的路由机制, 自动将请求发送到正确的节点上, 实现透明访问
负载均衡: 在 Redis 集群中, 数据和请求会自动分布到不同的节点上, 实现负载均衡, 这样可以避免单个节点过载, 提高系统的稳定性和性能
扩展性好: 通过使用 Redis 集群, 可以便利地扩展系统的容量和性能, 将数据和请求分布到多个节点上, 提高整体系统的吞吐量和承载能力
高可用性: 通过 Redis 集群, 可以将数据分布到多个节点上, 实现数据的冗余备份和容错能力, 当部分节点不可用时, 集群仍然可以继续提供服务, 保证系统的可用性
功能限制
key 批量操作支持有限, MSET、MGET等只支持具有相同 slot 值的 key 执行此批量操作, 需要使用分组方式 MSET name:{user_id} zhangsan age:{user_id} 20 addr:{user_id} beijing
key 事务操作支持有限, 只支持多 key 在同一节点上事务操作, 当多个 key 分布在不同节点上时无法使用事务功能
key 作为数据分区的最小粒度, 因此不能将一个大的键值对象如 hash、list等映射到不同的节点
不支持多数据库
复制结构只支持一层, 从节点只能复制主节点, 不支持嵌套树状复制结构
命令 使用 redis-cli -c -p port 命令接入集群节点
redis-cli --cluster help # 查看集群命令帮助信息
redis-cli --cluster create <host1:port1> … <hostN:portN> # 创建指定 IP 和 Port 的服务器作为集群
--cluster-config-file <file> # 集群配置文件
--cluster-replicas <num> # 指定集群中主节点和从节点数量的比例, 1 表示 1:1
--cluster-timeout <ms> # 节点超时时间
--cluster-yes # 自动确认配置
-a <password> # 设置密码
--askpass # 交互式输入密码
redis-cli --cluster add-node <new_host:new_port> <existing_host:existing_port> # 添加集群节点
--cluster-slave # 添加为从节点
--cluster-master-id <id> # 添加到指定节点 ID
redis-cli --cluster del-node <host:port> <node_id> # 删除集群节点
redis-cli --cluster replicate <host:port> <node_id> # 设置主节点的副本
redis-cli --cluster reshard <host:port> # 手动重新分配节点槽位
--cluster-from <node-id> # 已有节点 id, 多个 id 之间使用半角逗号分隔
--cluster-to <node-id> # 新节点 id
--cluster-slots <num-of-slots> # 新节点的 hash 槽数量
redis-cli --cluster rebalance <host:port> # 自动重新分配节点
--cluster-weight <node1=w1> … <nodeN=wN> # 分配节点权重
--cluster-timeout <timeout> # 节点超时时间
--cluster-threshold <threshold> # 节点阈值
--cluster-use-empty-masters
redis-cli --cluster setslot <slot-stat>…<slot-end> node <node-id> <host:port> # 设置槽位范围到指定节点
1 redis-cli --cluster setslot 0-500 node abc123... 127.0.0.1:6379
redis-cli --cluster failover [force|takeover] # 手动故障转移
force # 不再跟主节点进行确认直接发起投票选举进行故障转移, 可能会丢失主节点接收的写操作, 绕过部分检测
takeover # 直接进行故障转移强制更新配置纪元替换主节点, 极有可能丢失数据, 完全绕过检测
redis-cli --cluster nodes <host:port> # 查看节点信息
redis-cli --cluster slots <host:port> # 查看节点槽位信息
redis-cli --cluster info <host:port> # 查看指定节点信息
redis-cli --cluster check <host:port> # 检查指定节点
redis-cli --cluster fix <host:port> # 修复节点槽位
--cluster-rebalance # 重新自动平衡
redis-cli --cluster import <host:port> # 导入指定节点
--cluster-from <external-host:external-port> # 从指定 id
--cluster-from-user <arg> # 指定用户名
--cluster-from-pass <arg> # 指定密码
redis-cli --cluster call <host:port> <command> [args…] # 集群节点执行指定命令
--cluster-only-masters 所有主节点
--cluster-only-replicas 所有副本节点
1 2 [root@centos7 workspace]# redis-cli --cluster --cluster-only-masters call host:port FUNCTION LOAD ...
redis-cli --cluster set-timeout host:port milliseconds # 设置节点的超时时间
redis-cli --cluster backup host:port backup_directory # 备份节点数据到指定目录
集群部署 集群命令 以下命令可以使用 redis-cli 命令连接服务器时执行
CLUSTER HELP 在 Redis 命令行中查看所有集群操作命令
1 127.0.0.1:6380> CLUSTER HELP
CLUSTER INFO
CLUSTER SLOTS 返回集群中 hash 槽的详细信息, redis 7.0 开始使用 CLUSTER SHARDS 命令代替
CLUSTER REPLICAS <node-id> 列出指定节点的所有副本节点的信息, 功能和 CLUSTER NODES 类似
CLUSTER NODES
CLUSTER REPLICATE <node-id> 配置当前节点为指定主节点的从节点
CLUSTER KEYSLOT <key> 计算指定 key 所在的 hash 槽
CLUSTER COUNTKEYSINSLOT <slot> 统计集群中 hash 槽中存储的 key 的数量
CLUSTER GETKEYSINSLOT <slot> <count> 获取当前节点槽位中的键的 count 数量
CLUSTER FAILOVER 手动启动集群故障转移操作, 此命令只能发送给集群从节点
FORCE 不再跟主节点进行确认直接发起投票选举进行故障转移, 可能会丢失主节点接收的写操作, 绕过部分检测
TAKEOVER 直接进行故障转移强制更新配置纪元替换主节点, 极有可能丢失数据, 完全绕过检测
CLUSTER FLUSHSLOTS 清空当前节点的所有插槽
CLUSTER MIGRATION 管理槽位迁移
编辑配置文件 创建 Redis 服务器配置文件, 引入默认配置文件并覆盖配置项, 开启集群模式cluster6379.conf, cluster6380.conf, cluster6381.conf, cluster6382.conf, cluster6383.conf, cluster6384.conf 6 个文件
集群配置, 基础配置
1 2 3 4 5 6 7 8 9 10 11 12 13 14 15 16 17 18 19 20 21 22 23 24 25 26 27 28 29 30 31 32 33 34 35 36 37 38 39 40 41 42 43 44 45 46 47 48 49 50 51 52 53 protected-mode no port 6379 appendonly yes daemonize yes cluster-enabled yes cluster-config-file nodes-6379.conf cluster-node-timeout 15000 cluster-require-full-coverage yes
启动 Redis 服务器 启动所有的 redis 服务器, 使用 ps -ef | grep redis 命令查看 redis 服务器进程
1
2
3
4
5
6
7
8
9
10
11
12
13
[root@centos7 redis-cluster]# redis-server cluster_6379.conf [root@centos7 redis-cluster]# redis-server cluster_6380.conf [root@centos7 redis-cluster]# redis-server cluster_6381.conf [root@centos7 redis-cluster]# redis-server cluster_6382.conf [root@centos7 redis-cluster]# redis-server cluster_6383.conf [root@centos7 redis-cluster]# redis-server cluster_6384.conf [root@centos7 redis-cluster]# ps -ef | grep redis root 3731 1 0 05:49 ? 00:00:00 redis-server 127.0.0.1:6379 [cluster] root 3737 1 0 05:49 ? 00:00:00 redis-server 127.0.0.1:6380 [cluster] root 3743 1 0 05:49 ? 00:00:00 redis-server 127.0.0.1:6381 [cluster] root 3749 1 0 05:49 ? 00:00:00 redis-server 127.0.0.1:6382 [cluster] root 3755 1 0 05:49 ? 00:00:00 redis-server 127.0.0.1:6383 [cluster] root 3761 1 0 05:49 ? 00:00:00 redis-server 127.0.0.1:6384 [cluster]
创建集群节点 使用 redis-cli --cluster create --cluster-replicas arg hostN:portN 命令创建集群节点, arg 参数表示集群主从节点的数量比例, 1 表示 1:1yes 表示接受当前配置信息并写入指定文件中, 最后输出 [OK] All 16384 slots covered. 表示集群创建完成
1
2
3
4
5
6
7
8
9
10
11
12
13
14
15
16
17
18
19
20
21
22
23
24
25
26
27
28
29
30
31
32
33
34
35
36
37
38
39
40
41
42
43
44
45
46
47
48
49
50
51
52
53
[root@centos7 redis-cluster]# redis-cli --cluster create --cluster-replicas 1 \ > 127.0.0.1:6379 127.0.0.1:6380 127.0.0.1:6381 \ > 127.0.0.1:6382 127.0.0.1:6383 127.0.0.1:6384 >>> Performing hash slots allocation on 6 nodes... Master[0] -> Slots 0 - 5460 Master[1] -> Slots 5461 - 10922 Master[2] -> Slots 10923 - 16383 Adding replica 127.0.0.1:6383 to 127.0.0.1:6379 Adding replica 127.0.0.1:6384 to 127.0.0.1:6380 Adding replica 127.0.0.1:6382 to 127.0.0.1:6381 >>> Trying to optimize slaves allocation for anti-affinity [WARNING] Some slaves are in the same host as their master M: 2b144f1d7bdb31000a519492be980c6634576462 127.0.0.1:6379 slots:[0-5460] (5461 slots) master M: a770892444fbbe4b7d9391b458ac04d6bcba26f0 127.0.0.1:6380 slots:[5461-10922] (5462 slots) master M: 76cb8ea9a5d6ba0fa43d31cfa4c33cea8442e07d 127.0.0.1:6381 slots:[10923-16383] (5461 slots) master S: 6c9823906baa11aba873a798cce3a3b3c95465f2 127.0.0.1:6382 replicates 2b144f1d7bdb31000a519492be980c6634576462 S: 4a56b76a379da615b606a499ae475e986eda3efd 127.0.0.1:6383 replicates a770892444fbbe4b7d9391b458ac04d6bcba26f0 S: eaf9833aa105e36b22f6330585a972239bab9f50 127.0.0.1:6384 replicates 76cb8ea9a5d6ba0fa43d31cfa4c33cea8442e07d Can I set the above configuration? (type 'yes' to accept): yes >>> Nodes configuration updated >>> Assign a different config epoch to each node >>> Sending CLUSTER MEET messages to join the cluster Waiting for the cluster to join . >>> Performing Cluster Check (using node 127.0.0.1:6379) M: 2b144f1d7bdb31000a519492be980c6634576462 127.0.0.1:6379 slots:[0-5460] (5461 slots) master 1 additional replica(s) S: 6c9823906baa11aba873a798cce3a3b3c95465f2 127.0.0.1:6382 slots: (0 slots) slave replicates 2b144f1d7bdb31000a519492be980c6634576462 M: a770892444fbbe4b7d9391b458ac04d6bcba26f0 127.0.0.1:6380 slots:[5461-10922] (5462 slots) master 1 additional replica(s) S: eaf9833aa105e36b22f6330585a972239bab9f50 127.0.0.1:6384 slots: (0 slots) slave replicates 76cb8ea9a5d6ba0fa43d31cfa4c33cea8442e07d S: 4a56b76a379da615b606a499ae475e986eda3efd 127.0.0.1:6383 slots: (0 slots) slave replicates a770892444fbbe4b7d9391b458ac04d6bcba26f0 M: 76cb8ea9a5d6ba0fa43d31cfa4c33cea8442e07d 127.0.0.1:6381 slots:[10923-16383] (5461 slots) master 1 additional replica(s) [OK] All nodes agree about slots configuration. >>> Check for open slots... >>> Check slots coverage... [OK] All 16384 slots covered.
连接节点服务器 使用 redis-cli -c -p port 命令接入集群节点
1 [root@centos7 redis-cluster]# redis-cli -c -p 6379
查看节点信息
方式一: 命令行中使用 redis-cli --cluster info host:port 命令查看指定节点的信息
1
2
3
4
5
6
[root@centos7 redis-cluster]# redis-cli --cluster info 127.0.0.1:6380 127.0.0.1:6380 (a7708924...) -> 3 keys | 5462 slots | 1 slaves. 127.0.0.1:6382 (6c982390...) -> 0 keys | 5461 slots | 0 slaves. 127.0.0.1:6381 (76cb8ea9...) -> 0 keys | 5461 slots | 1 slaves. [OK] 3 keys in 3 masters. 0.00 keys per slot on average.
方式二: 在 Redis 命令行中使用 CLUSTER INFO|SLOTS|NODES 查看节点信息
1 2 3 4 5 6 7 8 9 10 11 12 13 14 15 16 17 18 19 20 21 22 23 24 25 26 27 28 29 30 31 32 33 34 35 36 37 38 39 40 41 42 43 44 45 46 47 48 49 50 51 52 53 54 55 56 57 58 59 60 61 62 63 64 127.0.0.1:6380> CLUSTER INFO cluster_state:ok cluster_slots_assigned:16384 cluster_slots_ok:16384 cluster_slots_pfail:0 cluster_slots_fail:0 cluster_known_nodes:6 cluster_size:3 cluster_current_epoch:7 cluster_my_epoch:2 cluster_stats_messages_ping_sent:468 cluster_stats_messages_pong_sent:473 cluster_stats_messages_meet_sent:1 cluster_stats_messages_auth-ack_sent:1 cluster_stats_messages_sent:943 cluster_stats_messages_ping_received:473 cluster_stats_messages_pong_received:469 cluster_stats_messages_fail_received:1 cluster_stats_messages_auth-req_received:1 cluster_stats_messages_received:944 total_cluster_links_buffer_limit_exceeded:0 127.0.0.1:6380> CLUSTER SLOTS 1) 1) (integer ) 0 2) (integer ) 5460 3) 1) "127.0.0.1" 2) (integer ) 6382 3) "6c9823906baa11aba873a798cce3a3b3c95465f2" 4) (empty array) 4) 1) "127.0.0.1" 2) (integer ) 6379 3) "2b144f1d7bdb31000a519492be980c6634576462" 4) (empty array) 2) 1) (integer ) 5461 2) (integer ) 10922 3) 1) "127.0.0.1" 2) (integer ) 6380 3) "a770892444fbbe4b7d9391b458ac04d6bcba26f0" 4) (empty array) 4) 1) "127.0.0.1" 2) (integer ) 6383 3) "4a56b76a379da615b606a499ae475e986eda3efd" 4) (empty array) 3) 1) (integer ) 10923 2) (integer ) 16383 3) 1) "127.0.0.1" 2) (integer ) 6381 3) "76cb8ea9a5d6ba0fa43d31cfa4c33cea8442e07d" 4) (empty array) 4) 1) "127.0.0.1" 2) (integer ) 6384 3) "eaf9833aa105e36b22f6330585a972239bab9f50" 4) (empty array) 127.0.0.1:6379> CLUSTER NODES 2b144f1d7bdb31000a519492be980c6634576462 127.0.0.1:6379@16379 myself,slave 6c9823906baa11aba873a798cce3a3b3c95465f2 0 1669529164000 7 connected eaf9833aa105e36b22f6330585a972239bab9f50 127.0.0.1:6384@16384 slave 76cb8ea9a5d6ba0fa43d31cfa4c33cea8442e07d 0 1669529164744 3 connected a770892444fbbe4b7d9391b458ac04d6bcba26f0 127.0.0.1:6380@16380 master - 0 1669529165776 2 connected 5461-10922 6c9823906baa11aba873a798cce3a3b3c95465f2 127.0.0.1:6382@16382 master - 0 1669529166000 7 connected 0-5460 76cb8ea9a5d6ba0fa43d31cfa4c33cea8442e07d 127.0.0.1:6381@16381 master - 0 1669529166792 3 connected 10923-16383 4a56b76a379da615b606a499ae475e986eda3efd 127.0.0.1:6383@16383 slave a770892444fbbe4b7d9391b458ac04d6bcba26f0 0 1669529165000 2 connected
数据操作 设置键时, 根据键散列后的值所在的插槽位置自动切换到插槽所在的节点上
1
2
3
4
5
6
7
8
9
10
11
12
13
14
15
16
17
18
19
20
21
22
127.0.0.1:6379> KEYS * (empty array) 127.0.0.1:6379> SET name zhangsan -> Redirected to slot [5798] located at 127.0.0.1:6380 OK 127.0.0.1:6380> GET name "zhangsan" 127.0.0.1:6380> MSET age 18 addr beijing (error) CROSSSLOT Keys in request don't hash to the same slot 127.0.0.1:6380> MSET age{y} 18 addr{y} beijing OK 127.0.0.1:6380> KEYS * 1) "age{y}" 2) "addr{y}" 3) "name" 127.0.0.1:6379> GET age{y} -> Redirected to slot [5474] located at 127.0.0.1:6380 "18" 127.0.0.1:6380> GET addr{y} "beijing"
测试节点 使用 kill 命令停止端口号为 6381 的 redis 进程时, 集群切换 6381 的状态为失联, 同时将从节点 6384 升级为主节点, 等到 6381 恢复后变为 6384 的从节点
1
2
3
4
5
6
7
127.0.0.1:6379> CLUSTER NODES 2b144f1d7bdb31000a519492be980c6634576462 127.0.0.1:6379@16379 myself,slave 6c9823906baa11aba873a798cce3a3b3c95465f2 0 1669529208000 7 connected eaf9833aa105e36b22f6330585a972239bab9f50 127.0.0.1:6384@16384 slave 76cb8ea9a5d6ba0fa43d31cfa4c33cea8442e07d 0 1669529208000 3 connected a770892444fbbe4b7d9391b458ac04d6bcba26f0 127.0.0.1:6380@16380 master - 0 1669529207000 2 connected 5461-10922 6c9823906baa11aba873a798cce3a3b3c95465f2 127.0.0.1:6382@16382 master - 0 1669529206000 7 connected 0-5460 76cb8ea9a5d6ba0fa43d31cfa4c33cea8442e07d 127.0.0.1:6381@16381 master - 1669529208334 1669529202178 3 disconnected 10923-16383 4a56b76a379da615b606a499ae475e986eda3efd 127.0.0.1:6383@16383 slave a770892444fbbe4b7d9391b458ac04d6bcba26f0 0 1669529209355 2 connected
1 2 3 4 5 6 7 8 127.0.0.1:6379> CLUSTER NODES 2b144f1d7bdb31000a519492be980c6634576462 127.0.0.1:6379@16379 myself,slave 6c9823906baa11aba873a798cce3a3b3c95465f2 0 1669529245000 7 connected eaf9833aa105e36b22f6330585a972239bab9f50 127.0.0.1:6384@16384 master - 0 1669529243086 8 connected 10923-16383 a770892444fbbe4b7d9391b458ac04d6bcba26f0 127.0.0.1:6380@16380 master - 0 1669529244194 2 connected 5461-10922 6c9823906baa11aba873a798cce3a3b3c95465f2 127.0.0.1:6382@16382 master - 0 1669529245227 7 connected 0-5460 76cb8ea9a5d6ba0fa43d31cfa4c33cea8442e07d 127.0.0.1:6381@16381 slave eaf9833aa105e36b22f6330585a972239bab9f50 0 1669529243552 8 connected 4a56b76a379da615b606a499ae475e986eda3efd 127.0.0.1:6383@16383 slave a770892444fbbe4b7d9391b458ac04d6bcba26f0 0 1669529244000 2 connected
添加主节点 redis-cli --cluster add-node 127.0.0.1:6386 127.0.0.1:6379 # 添加主节点 6386
重新分配槽位
redis-cli --cluster rebalance 127.0.0.1:6379 --cluster-use-empty-masters
redis-cli --cluster rebalance 127.0.0.1:6379 --cluster-weight 127.0.0.1:6380=1.5 --cluster-weight 127.0.0.1:6381=1.0
手动重新分片 redis-cli --cluster reshard 127.0.0.1:6379 # 交互式重新分片
添加从节点 按照 编辑配置文件 创建并修改 cluster6385.conf 文件redis-server cluster6385.conf, 同时查看服务器是否正常启动
redis-cli --cluster add-node --cluster-slave 127.0.0.1:6385 127.0.0.1:6379 将 6385 添加为 6379 的从节点
1 2 3 [root@centos7 redis-cluster]# redis-cli --cluster add-node --cluster-slave \ > 127.0.0.1:6385 127.0.0.1:6379
1 2 3 4 5 6 7 [root@centos7 redis-cluster]# redis-cli --cluster info 127.0.0.1:6379 127.0.0.1:6379 (8e20e97a...) -> 0 keys | 5461 slots | 2 slaves. 127.0.0.1:6381 (fba8c2ae...) -> 0 keys | 5461 slots | 1 slaves. 127.0.0.1:6380 (57c53adc...) -> 0 keys | 5462 slots | 1 slaves. [OK] 0 keys in 3 masters. 0.00 keys per slot on average.
删除节点 迁移主节点所有槽位
redis-cli --cluster rebalance 127.0.0.1:6379 --cluster-weight 127.0.0.1:6386=0 # 清空 6386 节点的槽位
redis-cli --cluster del-node 127.0.0.1:6379 <6386-node-id> # 删除节点