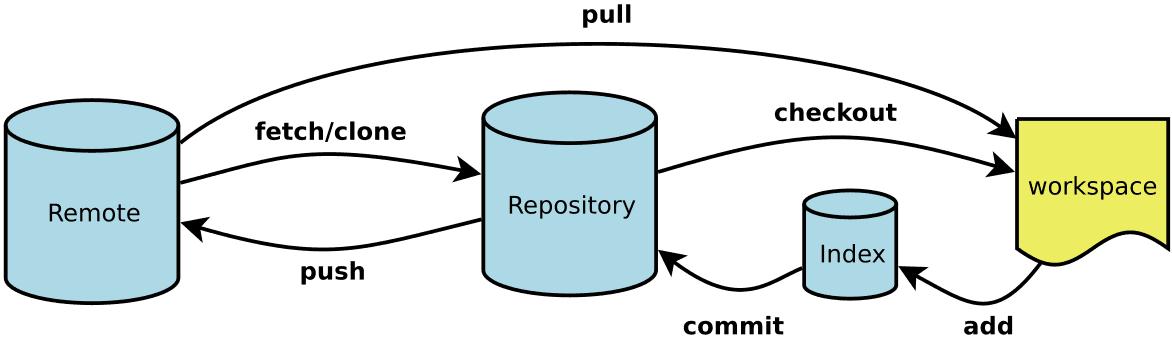
初始化
- git init # 在当前目录新建一个
Git代码仓库 - git init [project-name] # 新建一个目录,将其初始化为
Git代码库 - git clone [url] # 下载一个项目和它的整个代码历史
Husky
Husky 是一个 Git hooks 工具,它让在 Git 仓库中使用 Git hooks 变得更加简单和方便
自动化代码质量检查
- pre-commit hook:在提交代码前运行
- pre-push hook:在推送代码前运行
- commit-msg hook:验证提交消息格式
项目结构
1 | .husky/ |
配置
- git config –system –unset credential.helper # 重置 Git 本地用户凭据
- git config –global credential.helper store # 存储 Git 本地用户凭据
- git config -l/–list # 显示当前的
Git配置 - git config –local -l # 显示本地配置
- git config –global -l # 显示全局配置
- git config -e [–global] # 编辑
Git配置文件 - git config [–global] user.name ‘[name]’ # 设置提交代码时的用户信息-用户名
- git config [–global] user.email ‘[email address]’ # 设置提交代码时的用户信息-邮箱
- git config –global alias.co checkout # 配置
checkout快捷键 - git config –global alias.lg “log –all –color –graph –pretty=format:’%Cred%h%Creset -%C(yellow)%d%Creset %s %Cgreen(%cr) %C(bold blue)<%an>%Creset’ –abbrev-commit” # 配置
log快捷键和显示历史颜色 - git config –global –unset name # 删除已配置的命令
- git config –global http.proxy # 查询到当前是否设置了代理
- git config –global –unset http.proxy # 取消代理
alias.log 美化
%H commit hash
%h commit short hash
%T tree hash
%t tree short hash
%P parent hash
%p parent short hash
%a[n|N] 作者名字
%a[e|E] 作者邮箱
%a[d|D|r|t|i] 日期格式
%c[n|N] 提交者名字
%c[e|E] 提交者邮箱
%c[d|D|r|t|i] 提交的日期格式
%d ref 名称
%e encoding
%s commit 信息标题
%f 过滤 commit 信息的标题使之可以作为文件名
%b commit 信息内容
%N commit notes
%g[D|d] reflog selector
%gs reflog subject
%Cred 切换至红色
%Cgreen 切换至绿色
%Cblue 切换至蓝色
%Creset 重设颜色
%C(color) 指定颜色
%n 换行
%m left right or boundary mark
%%a raw %
%x00 print a byte from a hex code
%w([[,[,]]]) switch line wrapping, like the -w option of git-shortlog(1).
1
git config [--global] alias.lg "log --color --graph --pretty=format:'%Cred%h%Creset -%C(yellow)%d%Creset %s %Cgreen(%cr) %C(bold blue)<%an>%Creset' --abbrev-commit"
远程仓库信息
- git remote # 显示远程仓库名
- git remote -v # 显示远程仓库名和地址
- git remote add <name> <url> # 添加远程仓库
- git remote rename <old-name> <new-name> # 修改远程仓库名
- git remote remove <name> # 删除远程仓库
- git remote show <name> # 显示远程仓库详细信息
- git remote get-url [–push] [–all] <name> # 显示远程仓库的地址
- git remote set-url <name> <url> # 替换远程仓库的地址(fetch/push)
- –add <name> <url> # 向远程仓库添加 push 地址
- –delete <name> <url> # 删除远程仓库的指定地址
增加/删除文件
- git add [file1] [file2] … # 添加到指定文件到暂存区
- git add [dir] # 添加指定目录到暂存区,包括子目录
- git add . # 添加当前目录的所有文件到暂存区
- git add -A/–all # 添加当前目录的所有文件到暂存区
- git add -i # 进入互动模式
- git rm [file1] [file2] … # 删除工作区文件,并将这次删除操作添加到暂存区
- git rm –cached [file] # 停止追踪指定文件,但该文件会保留在工作区
- git mv [file-original] [file-renamed] # 文件重命名,并将此次操作添加到暂存区
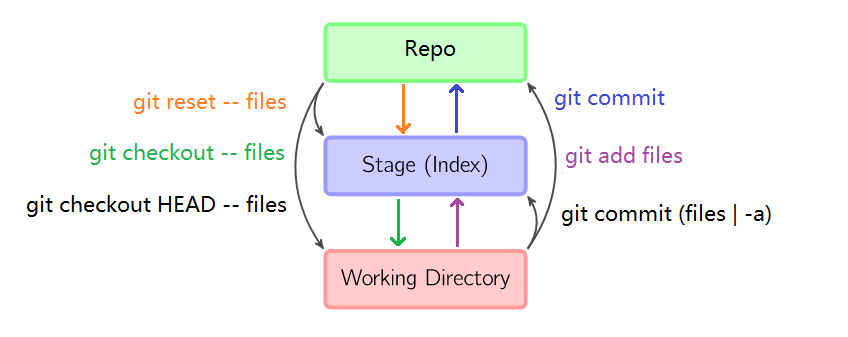
撤销
checkout
- git checkout – [file] # 撤销工作区指定文件的修改
- git checkout [commit] [file] # 恢复某个
commit的指定文件到工作区 - git checkout . # 恢复上一个
commit的所有文件到工作区
revert
- git revert [options] commit-ish… #撤销一个或多个 commit 操作
- git revert –no-commit/-n <commit-ish> # 新建一个 commit 撤销一个或多个 commit,手动 commit
reset
- git reset [file] # 重置暂存区的指定文件,与上一次
commit保持一致,但工作区不变 - git reset –hard # 重置暂存区和工作区,与上一次
commit保持一致 - git reset [commit] # 重置当前分支的指针为指定
commit,同时重置暂存区,但工作区不变 - git reset –hard [commit] # 重置当前分支的 HEAD 为指定
commit,同时重置暂存区和工作区,与指定 commit 一致 - git reset –keep [commit] # 重置当前 HEAD 为指定
commit,但保持暂存区和工作区不变 - git reset –soft HEAD^ # 还原版本库到上一个版本
- git reset –mixed HEAD^ # default, 还原版本库、暂存区到上一个版本
- git reset -–hard HEAD^ # 还原版本库、暂存区、工作区到上一个版本
- git reset -–hard HEAD~3 # 还原到第三个版本
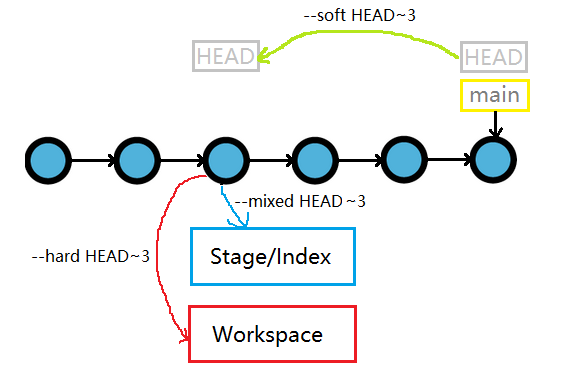
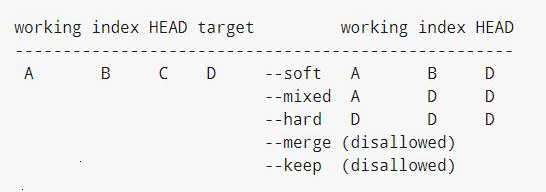
reset 回退操作时只在当前分支的 commit 上操作, 跳过 merge 进来的 commit
restore
Git 2.23 引入, 用于简化和改进文件恢复操作,相比于旧的命令(如 git checkout 和 git reset),它更专注于恢复文件内容和工作区状态
1 | git restore [options] [\<pathspec\>…] |
- -s,–source=<commit> 从指定的提交中恢复文件内容。默认为 HEAD,即当前提交
- -S,–staged 恢复暂存区中的文件内容到工作区中
- -W,–worktree 默认, 撤销工作区的修改(丢弃未暂存的更改)
- -2,–ours 在合并冲突时,恢复为当前分支的版本(即”我们”的版本)
- -3,–theirs 在合并冲突时,恢复为另一个分支的版本(即”他们”的版本)
- –dry-run 显示将要恢复的文件和路径,而不实际进行恢复
- -p 交互式恢复
- git restore . 恢复工作区的整个工作目录
暂存
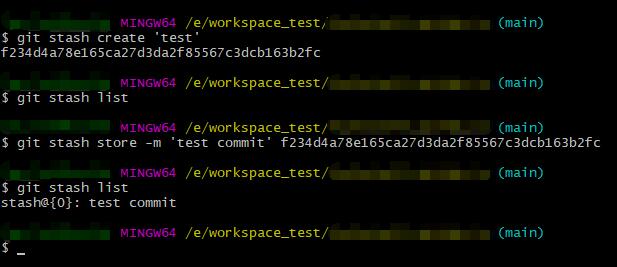
- git stash # 将没有提交的内容(包含工作区和暂存区)保存至堆栈中
- 如果工作区的文件没有被 git 管理过, 就不能被保存到堆栈
- [-u | –include-untracked | –only-untracked] # 对未追踪文件进行暂存
- [-a | –all] # 对所有文件进行暂存
- -S, --staged # 只暂存暂存区的修改
- -k,--[no-]keep-index # 只暂存工作目录的修改
- [(-m | –message) <message>] # 同命令 git stash save
- git stash save [<message>] # 保存堆栈时添加备注信息
- git stash branch <branchname> [<stash>] # 将堆栈中指定的条目迁出到新分支上
1 | # 基于 stash@{1} 创建新分支 new-feature, 创建成功时删除 stash@{1} |
- git stash list # 列出堆栈中保存的记录
- git stash show [<stash>] # 查看堆栈中最新保存的更改信息
- git stash pop [stash@{n}] # 取出堆栈中指定的 stash 并移出堆栈中
- git stash apply [stash@{n}] # 取出堆栈中指定的 stash 不移出堆栈中
- git stash drop [stash@{n}] # 移出堆栈中指定的 stash, 配合 apply 使用
- git stash clear # 清空堆栈中
代码提交
git commit -m ‘message’ # 提交暂存区到仓库区
git commit [file1] [file2] … -m ‘message’ # 提交暂存区的指定文件到仓库区
git commit -a # 提交工作区自上次
commit之后的变化,直接到仓库区git commit -v # 提交时显示所有
diff信息git commit –amend -m ‘message’ # 使用一次新的
commit,替代上一次提交, 如果代码没有任何新变化,则用来改写上一次commit的提交信息git commit –amend [file1] [file2] … # 重做上一次
commit,并包括指定文件的新变化git commit -n, --no-verify # 提交时忽略 pre-commit 和 commit-msg hooks
查看信息
status
- git status # 显示有变更的文件
- git status –porcelain # 显示工作区和暂存区的有变更的文件及路径
log
git log # 显示当前分支的历史版本
git log origin/master # 查看远程分支的历史记录
git log –stat # 显示
commit历史,以及每次commit发生变更的文件git log –follow [file] # 显示某个文件的版本历史,包括文件改名
git log –stat –summary # 查看每个版本变动的档案和行数
git log -p [commit] [file] # 显示指定版本号指定文件的修改详情
git log –max-count=[number] # 显示最近的 [number] 个提交
git log –skip=[number] # 跳过 [number] 个提交
git log –[since|after|before]=[date] # 限定时间范围
git log –branches[=<pattern>] # 限定分支范围
git log –tags[=<pattern>] # 限定标签范围
diff
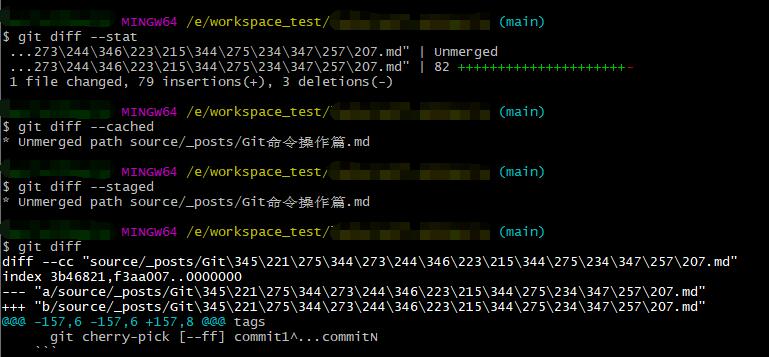
git diff [options] [commit [commit]] [–] [path…] # 比较指定文件的指定版本之间的不同
git diff [first-branch] … [second-branch] # 显示两次提交之间的差异
git diff # 显示暂存区和工作区的差异
git diff –cached [file] # 显示暂存区和上一个
commit的差异git diff HEAD # 显示工作区与当前分支最新
commit之间的差异git diff –staged # 比较暂存区和版本库差异
git diff –stat # 仅仅比较统计信息
git diff –check # 它将会找到可能的空白错误并将它们为你列出来
git diff –name-only 只显示有变更的文件名及路径
blame/show/whatchanged
- git whatchanged [file] # 显示某个文件的版本历史,包括文件改名
- git blame [file] # 显示指定文件是什么人什么时候修改过
- git show [commit] # 显示某次提交的元数据和内容变化
- git show –name-only [commit] # 显示某次提交发生变化的文件
- git show [commit]:[filename] # 显示某次提交时,某个文件的内容
- git reflog # 显示当前分支的最近几次提交
标签
-l --list
-d, --delete
git tag # 列出所有 tag
git tag [tag] # 新建一个
tag,在当前commit上git tag [tag] [commit] # 新建一个
tag,在指定commit上git show [tag] # 查看
tag信息git push [remote] [tag] # 提交指定
taggit push [remote] –tags # 提交所有
taggit tag -d [tagname] # 删除一个本地标签
git push origin :refs/tags/[tagname] # 删除远程仓库的指定标签
git checkout -b [branch] [tag] # 新建一个分支,指向某个
taggit tag -m <message> # 在当前 commit 上创建一个 tag 并添加注释
git tag -e [tagname] # 编辑一个 tag 的注释
git tag –contains [commit] # 显示包含指定提交的标签
git tag –merged [commit] # 显示包含指定提交的标签
git tag –sort <key> # 按照指定的排序方式显示标签
分支
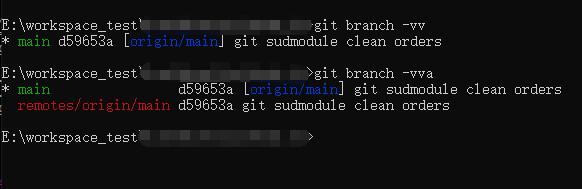
git branch -vv # 列出分支的信息
git branch -l # 列出本地所有分支
git branch -r # 列出本地所有远程分支
git branch -a # 列出本地所有分支和远程分支
git branch -d [branch-name] # 删除分支
git branch -m old_branch_name new_branch_name # 分支重命名
git branch [branch-name] # 新建一个分支,但依然停留在当前分支
git branch [branch-name] [master] # 基于某指定分支新建分支
git branch -D [branch-name] # 强制删除分支
git branch -dr [remote/branch] # 删除远程分支, 建议使用 git push origin –delete [remote_branch_name]
git branch [branch] [commit] # 新建一个分支,指向指定
commitgit branch –track [local-branch] [remote-branch] # 新建一个分支,与指定的远程分支建立追踪关系
git branch –set-upstream-to=[remote-branch] [local-branch] # 手动建立追踪关系,在现有分支与指定的远程分支之间
git checkout -b [branch] # 新建一个分支,并切换到新分支
git checkout [branch-name] # 切换到指定分支,并更新工作区
git push origin –delete [remote_branch_name] # 删除远程分支
cherry
比较两个分支之间提交差异的工具,特别适合识别哪些提交已经或尚未被应用到目标分支.
+开头的行表示提交只存在于当前分支-开头的行表示提交已经存在于比较的分支
1 | git cherry [-v] [<upstream> [<head> [<limit>]]] # 比较分支的提交差异 |
- -v,--[no-]verbose 显示完成的提交信息
cherry-pick
--continue 继续 cherry-pick 操作
--abort 完全取消整个 cherry-pick 操作序列
--skip 跳过当前冲突的提交,继续下一个
--quit 退出 cherry-pick 操作但保留已完成的更改, 忽略剩余的提交序列
-e, --[no-]edit 编辑提交信息
-n, --no-commit 应用提交但不自动提交
-x 在提交信息中追加来源信息
-X, --[no-]strategy-option <option> # 配置 merge 策略
-m, --mainline <parent-number> 处理合并提交时指定主分支
--ff 使用快进方式
--allow-empty 允许应用空提交
--allow-empty-message 允许应用空消息的提交
--empty=(drop|keep|stop) 如何处理被 cherry-pick 的提交与当前历史记录中已有的更改重复的情况
- drop 这个提交会被丢弃
- keep 这个提交会被保留, 暗含 –allow-empty 选项
- stop 默认行为, 当提交被应用时, cherry-pick 操作将停止, 允许检查该提交
git cherry-pick [options] commit0 commit1…commitN # 选择 commit 区间合并, 含尾不含头
git cherry-pick [options] commit1^…commitN # 选择 commit 区间合并, 包含头和尾
1 | git cherry-pick [--edit] [-n] [-m <parent-number>] [-s] [-x] [--ff] [-S[<keyid>]] <commit>... |
rev-list
按照时间顺序倒序列出提交对象
1 | git rev-list [<options>] <commit>... [--] [<path>...] |
-n <n> 限制输出的提交数量
--max-count=<n> 限制输出的提交数量
--skip=<n> 跳过指定数量的提交
--since <date> 指定开始时间
--until <date> 指定结束时间
--after <date> 指定开始时间
--before <date> 指定结束时间
--merges 只显示合并后的提交
--no-merges 不显示有一个以上父级的提交
switch
Git 2.23 引入, 用于更清晰地切换分支, 作用与 git checkout 类似,但提供了更清晰的语义和错误检查。
1 | git switch [options] \<branch-name\> [\<start-point\>] |
- -c,–create 创建并切换到新分支上, 指定 start-point 后,就可以根据历史上的其他点创建分支,而不是 HEAD 当前指向的点
- - 切换到前一个分支上
- -d,–detach 切换到用于检查和可丢弃实验的提交, 不创建新分支
- -C,–force-create 类似于 –create,但如果 新分支 已经存在,它将被重置为 <start-point>
- -m,–merge 将本地的文件修改合并到新分支上
merge
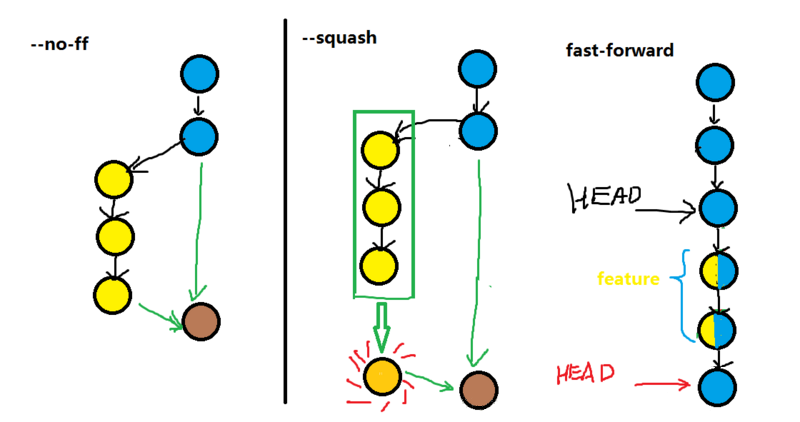
- --fast-forward(ff): 快速合并, 不创建新的 commit, 原分支删除后提交记录消失, 默认方式
- --no-ff: 不快速合并, 保留原有分支记录, 创建新的 commit
- --squash: 合并一些不必要的 commit, 创建新的 commit
- --stat: 合并结束后统计显示区别
- --continue: 解决冲突后结束合并
- --abort: 中断解决冲突结束合并
- --quit: 放弃合并
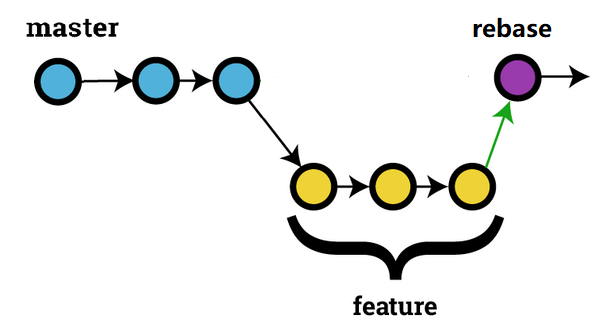
rebase
- -i,--interactive: 交互式操作
- --continue: 解决冲突后结束合并
- --abort: 中断解决冲突结束合并
- --quit: 放弃合并
- --skip: 重启合并跳过当前的修改
合并多个 commit
git rebase -i HEAD~n # 交互式合并从当前 commit 开始的 n 个commit
远程同步
fetch
- git fetch origin [
[: ]] # 拉取远程分支 - git fetch origin # 拉取所有远程分支信息
- git fetch origin remote_branch_name # 拉取指定远程分支信息到本地
- git fetch origin remote_branch_name:local_branch_name # 拉取指定远程分支到本地指定分支上
- 如果 local_branch_name 与当前工作分支名相同, 则提示 fatal: Refusing to fetch into current branch refs/heads/master of non-bare repository.
- 如果 本地已存在 local_branch_name, 则提示 ! [rejected] remote_branch_name -> local_branch_name (non-fast-forward)
- 否则在本地创建 local_branch_name, 并切换到 local_branch_name 上
- git fetch origin + pu:pu maint:tmp # 拉取远程仓库的 pu 和 maint 分支 到本地的 pu 和 tmp 分支上, 只有 pu 分支会被更新即使没有变动
pull
- git pull origin [
[: ]] # 拉取远程分支并快速合并, –set-upstream-to 参数有影响 - git pull origin # 拉取所有远程分支信息并快速合并
- git pull origin remote_branch_name # 拉取指定远程分支信息到本地当前工作分支上,并执行快速合并
- git pull origin remote_branch_name:local_branch_name # 拉取指定远程分支信息到本地指定分支,并快速合并到当前工作分支上
- 如果 local_branch_name 已存在, 则提示 ! [rejected] remote_branch_name -> local_branch_name (non-fast-forward)
- 如果 local_branch_name 不存在, 则创建新分支 local_branch_name, 并快速合并到当前工作分支上,不会自动切换分支
- git pull origin master –allow-unrelated-histories # 允许合并远程仓库和本地仓库无关的历史,一般用在关联两个仓库更新版本历史问题
push
- git push origin local_branch_name:remote_branch_name # 推送本地分支到远程分支, 如果远程分支不存在, 则新建
- git push origin –force # 强行推送当前分支到远程仓库,即使有冲突
- git push origin –all # 推送所有分支到远程仓库
- git push origin –delete [remote_branch_name] # 删除远程分支,功能同下
- git push origin :[remote_branch_name] # 删除远程分支,功能同上
其他
- git archive # 生成一个可供发布的压缩包
- git grep [options] # 查找功能
- git gc # 压缩历史消息节约空间
- git fsck # 对仓库进行检查
- git bisect # 查找问题
- git blame # 查找问题
notes
添加、移除或读取附加在对象上的注释,而不影响对象本身
1 | git notes add -m "This is a note" <object>; |